
URL: https://it.desy.de/e5/e47892/e157264/index_eng.html
Breadcrumb Navigation
Open AFS with the Network Identity Manager
An AFS client is used to get access to the distibuted file system AFS. Using Windows the AFS is access with paths like e.g. \\afs\desy.de\user. As soon as you have installed the AFS client using the software shop DSM and rebooted your computer you will see the following network drives in addition to H:, N: and S:
- P:\
-
Q:\
P:\ is you personal AFS home directory, Q:\ is the AFS group directory of your DESY group.
To get access to these drives with Windows and get access to AFS in general a so called AFS client is necessary. This web site gives a short overview about how to install and use the AFS client.
Error - Access Denied
If you should get the error message which hints to a loss of permissions for a specific path "Access Denied" this not necessarily means that you have not the needed permissions to access this path.
This eventually could just mean that you don't have a valid AFS token. Please check, whether a valid AFS token is available within the current session. If you are not sure please just follow the steps again which are described in chapter "Getting an AFS Token" to get a valid token or renew it. Please note that an AFS token is only valid for max. 24 hours, afterwards it has to be renewed!
Installation und Configuration
Installation with NetInstall
The installation can be processed by using NetInstall (NI). The NetInstall installation package OpenAFS with Network ID Manager can be found under the category "Communications".
If you have already installed a version of OpenAFS, please uninstall it first, reboot your computer and afterwards install OpenAFS with the Network ID Manager using NetInstall.
The NetInstall installation package is pre-configured, so no further configurations are necessary normally. Advanced settings (e.g. other identities) can be setup using the Network Identity Manager.
Installation and Configuration without NetInstall
If you do not have NetInstall available you can find the required packages for a manual installation on:
https://linux.desy.de/distributions/scientific_linux_at_desy/software/downloads/windows/
Install the packages as follows:
- Uninstall the old AFS client if existent and reboot your computer
- Install openafs-en_US-64bit-1-7-2600.msi and reboot your computer
- Install openafs-32bit-tools-en_US-1.7.2600.msi
- Install Heimdal-AMD64-full-1-5-100-930.msi
- Install netidmgr-AMD64-rel-2_0_102_907.msi
Finally, copy the krb5.conf and replace the existing krb5.conf at:
C:\ProgramData\Kerberos
AFS Token beschaffen

")
Login screen
As soon as the AFS Client / Network Identity Manager has been installed, a window having the title "Obtain new credentials" pops up every time someone loggs in to the Windows computer (see image above).
In this window please enter your password in the needed text field to get an AFS Token and click on "Finish". Afterwards you should own a valid AFS Token which is valid until you logout or after 24 hours. With this token you will be able to access all AFS paths on Q: and P: you have access to.
Open the Network Identity Manager
If the above mentioned window does not pop up automatically after a user logged in to the computer you will have to open the Network Identity Manager manually as follows: Click on Windows start menu -> All Programs -> "OpenAfs - NetIDMgr (DESY)" -> "Network Identity Manager".
As soon as the Network Identity Manager is opened press the shortcut Ctrl + N to force opening the window which asks for your password. Afterwards enter your password and click on "Finish".
Expiration of an AFS Token
An AFS Token will expire if one of the below mentioned cases is met:
- You logout from the Windows computer or have shut it down
-
You are logged in more than 24 hours on the computer
If one of the above mentioned cases is met the AFS token has to be renewed to get again access to all AFS paths using your permissions. So if necessary please follow the above mentioned steps to be able to enter your password and this way renewing your AFS token.
Create further Identities
Creating more identities
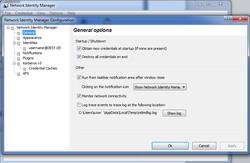
In "General Options" you can select different settings. At first it will be explained how to create another identity.
and in the following you will find explanations on all other settings / functions.

")
Open the NIM

")
Click on "Options" and select in the drop down box "General".
")
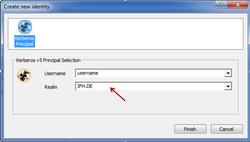
Choose "Identities" in the selection menu and click "Add new identity ..." in the right window.
")
Enter in the new window in "Realm", the new Kerberos domain, and in "User Name" the user name for the domain.
Make sure that you write the domain name always in capital letters (e.g. CERN-username for your domain CERN.CH).
Then click "Finish".
")
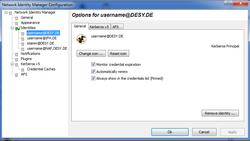
If you have multiple identities, click the identity that you want to edit and set in the "General" tab the check mark for "Always show in the credentials list (pinned)".
This has the effect that this identity will always be shown in the start window.

")
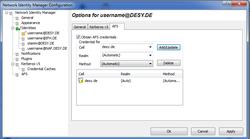
Under "Options" of the relevant identities there can be found the tab "Kerberos v5" where the Lifetime and automatically renewable time of Kerberos tickets is shown.
You don't need to change anything. Leave the check mark in "Can be forwarded to other machines" and "Adressless ". The option for 'Adressless' is used especially for wireless connections (laptop, etc.) after changing the location or closing the laptop. The password has not to be entered again.
")
In the field 'Cell' please enter AFS as cell name (desy.de, ifh.de, cern.ch. ...) in lowercase.
Leave the rest to AUTOMATIC settings, click 'Add / Update' and then 'Apply'
Configuring Kerberos v5 manually
Kerberos v5 Configuration
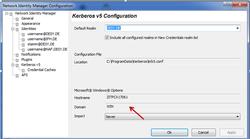
")
In item "Kerberos v5" you can see the default settings for Kerberos and the default realm (here DESY.DE).
Below you can find the computer name and domain of the computer. Do not change the domain!
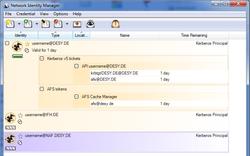
")
If you have multiple identities, you can identify the active identity by the green display. The graphical display shows also e. g. how long a ticket is still valid.
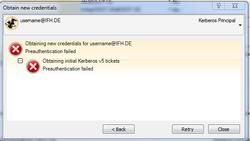
")
If your credentials are expired or invalid, you will receive this error message.