URL: https://it.desy.de/e5/e281682/e312918/index_eng.html
Breadcrumb Navigation
Workflows in the form management system (FMS)
What are workflows and why to use them?
In general workflows are processes through which a piece of work passes from initiation to completion with the aim of achieving the greatest possible efficiency. In reference to the form management system (FMS) this means that often forms are not just filled out and signed by a single person, but that several people are involved in this process. For this issue the FMS provides electronic support and allows the processing of forms to be shared with other people within the FMS. The workflow in FMS makes it possible to edit forms together, to inform other people about the content of one form or to receive the required approvals.
Working with Ad hoc workflows
The implementation of workflows in the FMS are defined as so called ad hoc workflows. That is why entries in forms can be made without restrictions by all people who are participating in the process. This implies that everyone is allowed to change already existing entries, too. Please note that only one person at a time can make changes to the form. However, the order to whom the process is sent or which lines to be filled, is not determined by the FMS and can be selected by yourself.
Workflows in the FMS
Using workflows in the FMS and the possibility of working together on single forms is intended to strengthen communication with each other and facilitate the handling with forms. In the following, functions and possibilities of ad-hoc-workflows are discussed and how you can send processes within the FMS to different people to work together on forms. If you do not have any experience with the form management system, please also read the associated brief instructions.
1. Which forms do have the workflow function?
As this is a relatively new implementation, it will take some time before the workflow process is embedded in all forms. Therefore not all forms can currently be viewed and processed collectively.
You can see if a workflow can already be used for a form by the green workflow element on the left above the form (Figure 1).
2. How you can edit forms using the workflow process
In general, the workflow process allows you to share the current status of a form with other people and if needed give them various degrees of authorization.
a) Send process for information
Just to notify people about a form, you can send the form’s workflow process for information. The recipient is able to see the content of the form, but can`t edit it. Furthermore, people who get the form as information are allowed to see any progress and changes of the form made in the ongoing process.
b) Send process for further processing (review)
If you want to add people to the workflow-process, you can send the process for further processing. People who are authorized to review your form, can actively change and customize the form and view any further progress. Note, that only one person at a time is able to edit the form. However, all people who are participating in the process, can request authorization at any time.
c) Send process for approval
Some forms require one or more signatures. People who receive the process for approval get a message to fill out certain signature fields and are allowed to edit the form in every sense. They also can follow the ongoing workflow-process.
Additional info:
If a workflow process is sent within the FMS, this does not mean that a form is sent as a file or similar. A form (and the content of the completed fields) leaves the form management system platform at no time and only various authorizations of your current form are sent within the FMS. People, who are participating in the workflow-process and accordingly have rights to the form, must still create a PDF-file to be able to print it. Please look at the quick guide FMS on how to create a PDF.
3. How is the workflow process initiated?
Open the form
To add one or several people to the workflow-process so that you can work together on a form or to just inform people about the content of the form, first open the form you want.
Please proceed as decribed in the quick guide FMS. For example to open a form, click on ‘Forms’ in the left menu and search for the selected one or display all available forms under ‘Forms A – Z’ in alphabetical order. Alternatively, you can open a form that you have already saved by clicking on the arrow-symbols.
The workflow menue
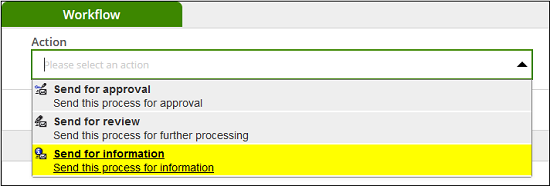
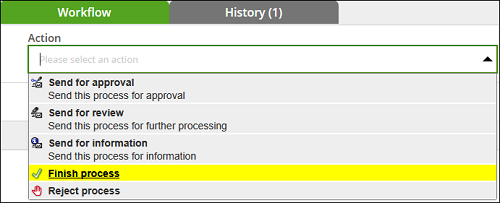
If the given form has implemented the workflow-function, the workflow-menu appears underneath the standard-menu of the FMS. After filling out the required fields on your form, click on the ‘Choose action’ button.
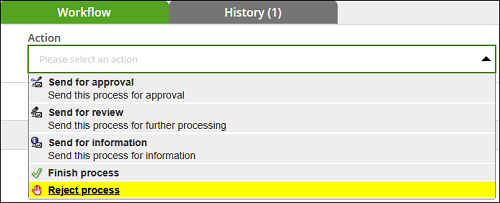
The FMS now offers several options for sending the process (or rather various authorizations) to different people. After the process has been sent to someone, the form is added to the workflow and can be viewed by all participating people. Note that the workflow-menu can vary depending on the form.
3.1 Send process for information
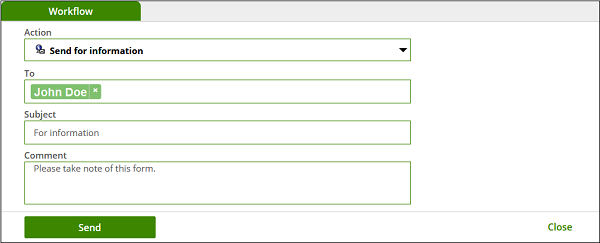
If you would like to inform one or more people about the content of the form, you can send a copy of the process. Sending is independent of whether the form has already been completely filled out or not. People who receive the process for information, are not actively participating in the process and therefore cannot edit your form. Nevertheless, these people can follow the entire future (and past) process.
First, enter all people to whom you want to send the process to. You can list every person who is also registered in the DESY-webmail address book. You are also free to specify several people or groups. You can find more info on how to include several people into the workflow process under the fourth section here ´How to inlcude several people into the workflow process´.
Enter a personal message in the comment section and provide the recipients with the necessary information about the form.
>>> What does the sender see?
After sending a process for information the created form is displayed under the heading “done” with the subject ‘For info’. By clicking on it the initiator can see the current status of the form, edit it or, if necessary, send the process to other people to include them in the workflow process.
>>> What does the recipient see?
The recipient receives an email with a link to the form and the senders comments. Alternativly they can find the form in FMS in the section ‘for info’. By clicking on the form, the entire content of the form and all filled out fields can be viewed but cannot be changed. In addition, the recipient cannot see any comments or future changes in the workflow process. You can find more info on this under the fifth section "How are changes in forms tracked?"
3.2 Send process for further processing
If you cannot fill out the entire form, you can pass the editing rights on to one or more of your selected collegues to include them in the workflow process. People who have the knowledge of the required information can then fill in the relevant fields and continue working on the form.
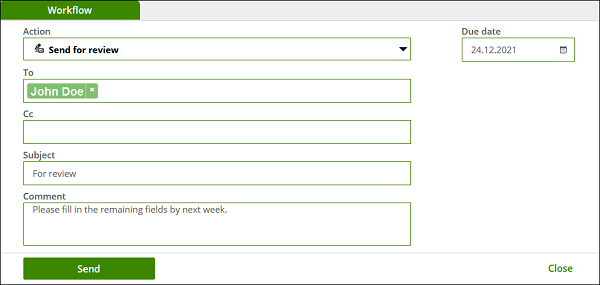
Similar to sending processes 'for information', all people in the DESY address book can also be selected when sending 'for processing'. You can also specify several people or groups. Note, however, that only one person can edit the form at a time. More detailed information on this topic can be found under the fourth point 'How are several people included in the workflow process?'. In addition, when you send a process for review, you can send the workflow process as info at the same time by entering the desired people under 'Copy'. Those will then receive a snapshot of the current processing status.
In the comment section you can enter a personal message and provide the recipient with the necessary information on the form to be filled out. Your comments are visible to all editors. Optionally, you can also set a due date for processing. This date is listed for the recipient so that if there are several forms to be filled in, these can be sorted accordingly. Forms that have exceeded the due date are highlighted in red so that you can immediately see which forms should have the highest priority for completion.
>>> What does the sender see?
The sent form is now listed under the section "done" with the subject 'For editing'. The status of the form has also been changed from 'Created' to 'Active', which indicates that the corresponding form is now in the workflow and is being processed by at least one other person. By clicking on the form, the creator can view it and observe future processing; However, it is no longer possible for him to change the form themself or to send the process to another.
>>> What does the recipient see?
Similar to 'Send for info', the recipients also receive an email with the necessary information for 'Send for review'. The form to be edited is now in the form management under the heading Tasks. By clicking on the form, the recipient can edit it independently. This also implies that fields that have already been filled in can be changed if necessary. Since the recipient is now involved in the workflow process, he also has the authorization to pass the process on to additional people for processing or to send it for information.
>>> The development of a workflow process
All people who have received the process for editing at least once are part of the workflow process for the form to be filled out. (* This means that those involved have the same rights over the form as the creator of the from: You can edit the form, pass the process on to additional people or find out about the currently saved status, the changes made to the form and its history. *) Under the fifth point 'How are changes to the form tracked?' you will find further information on this.
a) Pass on the authorization to edit the form
Only one person is authorized to edit the form at a time. This person is able to give up your authorization at any time by sending the process to another person for editing. This can be a person who is already involved in the workflow process or an additional person who is then automatically included in it.
b) Request authorization to edit the form
It is quite possible that the person who has to edit the process cannot be reached or that you decide to make changes to the form yourself. In this case, every person who is involved in the workflow process has the right to withdraw the process and thus to request editing authorization. Incidentally, people who have been withdrawn from a process are not removed from the workflow, but can continue to participate in the entire process.
Please click on the appropriate form, then under the workflow menu on 'Withdraw case'. Finally, give a short comment. The authorization to edit the form is now withdrawn from the original recipient. If the unavailable person has already made changes to the form (or other people have already edited the form), these changes will be adopted and you can edit the currently saved form. It is also possible to send the process to additional people so that each person is able to continue the workflow process independently.
3.3 Submit process for approval
Some forms require one or more signatures from certain people, which can also be given digitally in the FMS. All you have to do is click on the hand symbol in the signature field provided and your name will be entered automatically. In the FMS workflow, it is possible to explicitly point out to the recipient that the form has to be signed by them.
In addition to the usual workflow options, the 'Send for approval' process is available for forms that require a signature (if the signature fields have already been signed, this option is no longer available).
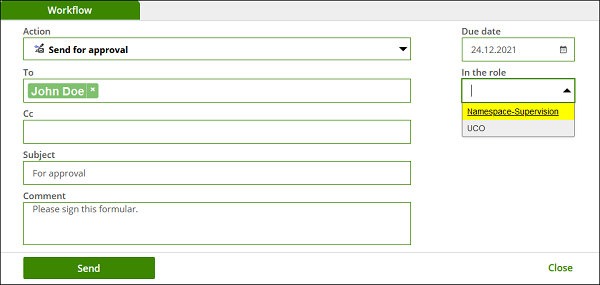
Here you can also send a copy of the case and enter a due date at the same time when sending cases 'for approval'. If several signature fields have to be filled in, you can also inform the recipient where he or she has to sign by selecting the relevant signature field under 'In the role'. If several people have to give their signature or several people have the authorization to do so, you can also list any number of people or groups. However, it is then no longer possible for individual persons to be assigned a specific role. For more information on sending processes to several people, see the fourth point 'How are several people included in the workflow process?'.
Please note that anyone who is involved in the workflow process is generally authorized to sign signature fields. This means that people who only have the process available for editing can fill in the signature fields. You should therefore check whether the relevant persons have also signed the fields provided for this purpose. You can often find the information you need to know by whom the form has to be signed near the signature fields under the heading 'Editing instructions'. Additional general information on the topic of digital signatures and their application outside of the FMS can also be found in the documentation 'Verfiy E-Mail Signatures'.
>>> What does the sender see?
The sent form is now listed under the heading Done with the subject 'For approval'. By clicking on the form, the creator can view the submitted form. However, if you want to continue editing the form or send the process to someone else, the process must be withdrawn.
>>> What does the recipient see?
The recipient receives an email with the information that the form needs to be signed. The corresponding form is now in FMS under the section Tasks. The recipient can edit the form independently, change fields that have already been filled in and finally set the required signature. The recipient is involved in the workflow process to the same extent as the recipient to whom you have sent forms for editing. This means that approvers can also pass the process on to additional people for editing or for information.
>>> Validity of signatures
If possible, send forms for approval only after they have been completely filled out. If the form is changed after the signature has been set, the signature will still be retained and therefore valid. The approver does not receive an email that changes have been made! However, they can view the further process by clicking on the form.
You can find more information on this under the fifth point 'How to track changes in forms'. Try to complete the process as soon as possible after placing the signature and avoid a workflow process that is too long, which involves frequent changes to the form. It is recommended that people who sign the form also complete the entire workflow process. Please also read the sixth point 'How to complete the workflow process' and follow the instructions given there.
4. How to include several people into the workflow
In order to send the process to different people and thus add several people to the workflow process at the same time, you can specify several individuals or even group names (such as forms@desy.de). The listing of several persons is possible for all actions that the workflow menu offers.
>>> Send process for information
If a process is sent to several people 'for info', all people are allowed to view the form and the further workflow process (but not to actively participate). The form appears for all listed individuals under the For info section. Members of group mails also have the category group tasks with the respective group names as a tab under which forms for information can be called up. Sending processes for info to several people is very similar to sending them to a single person, which has already been described in more detail under the third point 'Send process for info'.
>>> Send process for further editing or approval
When submitting cases 'for editing' or 'for approval', the development of the workflow differs slightly between individuals and multiple people. Since only one person can edit or sign the process at the same time, a selection field appears for the respective person after opening the form. This informs about which persons are authorized to edit the process. By clicking on 'Take over editing', the process can be taken over by a person in the group and the form can be adjusted by them.
If you have sent the process to several individuals, the form will appear for them under the Tasks section. People belonging to group mails can call up the form under the heading of the respective group name. As soon as a person has accepted the form for editing, the current processor is listed in the information overview of the corresponding form.
The person who takes over the process is able to edit the form or send the process to other people in the workflow menu. In addition, this person can return the editing rights to the entire group at any time. Then all members of the group are listed again as editors in the information overview.
If one person has already taken over the editing, it is still possible for everyone else to view the current form and thus any saved changes and to request authorization to edit the form. The 'acquire' option is still available for everyone involved. As with the 'resign' option for individuals, the rights to edit the other person are withdrawn for this moment and taken over yourself.
Please note that when you send processes to several people, all recipients receive all authorizations via the form and are fully involved in the workflow process. This means that these people can edit the form, forward the process and save it within the FMS and, if necessary, print it. All persons are also allowed to end the process, which can be found under the sixth point 'How are forms completed?' and the seventh point 'How can the workflow process be canceled?' is explained in more detail.
5. How to track changes made in forms
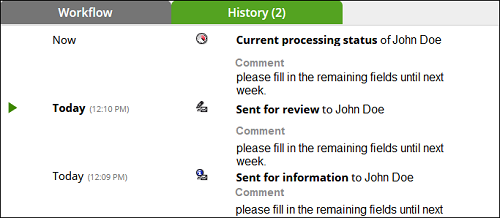
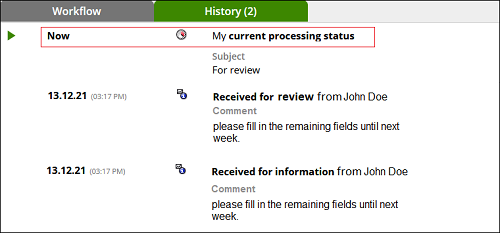
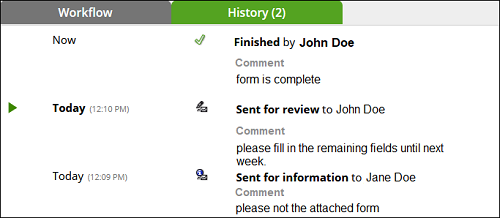
As soon as a process has been sent to at least one person, the form is in the workflow. This means that at least two people can call up information about the currently to be filled out form. This happens regardless of whether the process was sent for editing, info or approval. In all cases, the so-called history appears in addition to the usual workflow menu. With the help of this tab, you can see the entire process and changes to the form at any point in time.
The history provides information about the time of sending, the recipient(s) and the sender. The latest changes to the form are displayed above. The comments made are also listed.
In the history you can click on all entries and thus call up the previous status of the form. If you have received the form for editing and now want to change or add entries, click on the current editing status. The form in the currently saved state is then opened.
If you are involved in the workflow process but do not currently have the form in front of you for editing, you can still view changes to the form via the history by clicking on the current editing status of the other person. You cannot edit the form, but you can still see changes if any have already been made. If several people involved in the workflow are also looking at the form, you will also receive information about this.
6. How to finish a process
As soon as a form has been filled out accordingly, the workflow process can be finished. This option is available once the form has been sent to at least one person for editing or approval. Please note, however, that completed forms can no longer be changed. This also implies that no more signatures can be placed.
Everyone involved in the workflow process has the opportunity to finish the process any time. This means that processes in which the form has not yet been fully completed or signed can be finished. Since no changes can be made to the form after finishing, it is recommended that, for example, only the creator of the form or the person who signs the form actually finishes it (this could be communicated through the comment section, among other things).
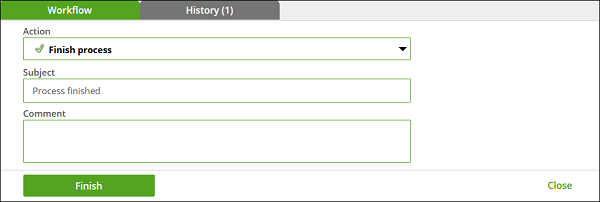
To complete a form, open the workflow menu as usual and click on 'Finish process'. Also enter a comment. This can be viewed by everyone involved.
>>> What happens after finishing a process?
As soon as the process has been finished, everyone involved in the workflow will receive an email informing them that the form has been completed. The form is now displayed under the heading Finished and also has the status 'Finished'. The last action carried out by the respective person in the workflow process is specified under 'Action'.
By clicking on the completed form, it is opened and can be viewed. The history of the form with all comments is also available so that the entire history can still be viewed. All persons also have the option of saving the completed form by clicking on the last entry under history and using the FMS menu and, if necessary, printing it. Saving and printing forms is described in the quick guide FMS. However, it is no longer possible to make further changes to the form or to send it to other people after completing a form.
7. How to cancel the workflow process
Sometimes forms or the workflow-process are no longer needed and thus the entire process can be rejected. Please note, however, that just as with finished processes, forms can no longer be edited or changed if the workflow is canceled. This is not only the case for the person who rejects the process, but for everyone involved.
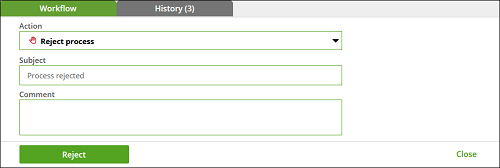
Everyone involved in the workflow process has the right to reject the process. Such a rejection means that the form cannot be processed further by any person involved or that it cannot be included in a workflow again. To cancel the workflow process, open the workflow menu as usual and click on 'Reject process'. You can also enter a comment, which can be viewed by everyone involved.
>>> What happens after rejecting a process?
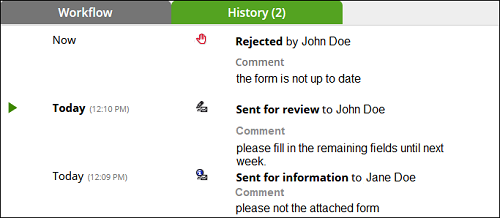
Processes that have been rejected are listed for everyone involved in the workflow under the heading Sent with the status 'Rejected'. Under the 'Action' column, each person can see what the last action in this process was in order to classify the process. In addition, everyone receives an email informing them that the process has been rejected.
Rejected processes can still be viewed in full by clicking on the corresponding form. In this way, the entire history and the form can be viewed in the last saved state. However, it is no longer possible for any of the persons involved to make further changes to the form. The form cannot be placed in a (new) workflow process again.


