
URL: https://it.desy.de/e5/e3664/e3760/e143351/index_eng.html
Breadcrumb Navigation
Printing from MAC intern
Printing on Apple OSX 10.10 (Yosemite)
For Mac OSX 10.10, there is currently no way to listen to adverts sent out by DESY printers/printservers, and so you instead must add printers manually. This recipe is tested on Mac OSX 10.8 but it will work in a similar way on most of the more recent releases of Mac OSX.
Please follow the steps carefully and use the provided driver file for your individual printer. Choosing a generic PS driver that comes with Mac OSX or an unconfigured third-party driver from the internet will result in an only partly working printer and will be a troublesome experience !
There are a few steps involved to get things right:
- First download the printerdriver PPD files
- Second turn on the Mac's webinterface for it's CUPS Server
- Third use the CUPS admin webpage to add the printer
- As an alternative to step two and three you can also use the internal Mac OS printerinterface or the command line
Download/install printerdriver (PPD) files
A list of all available printers at DESY can be found here:
http://www-it.desy.de/systems/services/printing/printer.html
If you plan to print from the DESY guestnetwork choose printer that are listed here:
http://www-it.desy.de/systems/services/printing/guestenetz-printer.html
Once you know which printer(s) you are looking for download the appropriate PPD files here and store them somewhere on your system (the default download folder is perfectly OK):
http://www-it.desy.de/systems/services/printing/unix/cups/PPD/
Turn on the Mac's webinterface for it's CUPS server
The webinterface maybe already running but if not you will need to start it manually from the command line in the Terminal window.
To do so open your webbrowser and point it to the local printer configuration webpage:
If the CUPS server doesn't have its web interface enabled, you will get an error message "Server internal error" together with a message telling you to start the web interface, which you should do:
sudo cupsctl WebInterface=yes
Reload the webpage http://localhost:631/admin you should now see the CUPS printer admin page.
Add the printqueues you would like to use
Click on 'Add Printer'
You might be prompted for a login by your webbrowser and you need an account on your local computer that has sufficient rights to administer the computer.
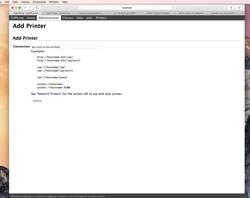
Click the radio button beside 'LPD/LPR Host or Printer', and then 'Continue'.
")
In the 'Connection' edit box, type the URI which corresponds to the printer you wish to use:
lpd://spool-lpr.desy.de/<PRINTERNAME>
You have to replace <PRINTERNAME> with the exact name of the printer you want to install, if you want to install the printer 'cfelps8' the string should look like:
lpd://spool-lpr.desy.de/cfelps8
HINT for DESY guestnet users:
As you won't be able to reach the central DESY printserver from the guestnet you have to use the equivalent server 'desyguestprint.desy.de' in the guest network.
The URI has to be changed accordingly:
lpd://desyguestprint.desy.de/<PRINTERNAME>
Click the 'Continue' button.
")
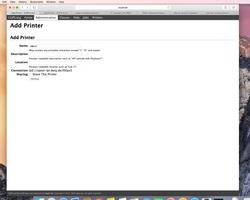
The next page prompts you for a 'Name' for the printer. We strongly recommend to use the 'official' name of the printer as it makes any support on our side very difficult if you come up with different printernames.
You can enter free text in the fields 'Description' and 'Location' or leave them blank.
Please do not share the printers you install on your Mac as it is not supported, so leave that box unchecked !
Once again, click 'Continue'.
")
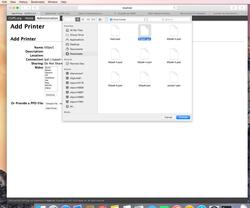
On the next screen you will need to provide details on the make and model of the printer.
This is the absolut crucial part of the installation process and the preconfigured PPD file(s) you downloaded earlier become handy !
First you should check the previously entered values in the upper part of the window and go backwards in the browser if you recognize any false values.
Ignore the options in the 'Make:' dropdown list and go to the line 'Or Provide a PPD File:'
Click 'Choose File'
In the pop-up window choose the appropriate PPD file from the location where you downloaded it earlier.
Click 'Add Printer' at the bottom of the page.
")
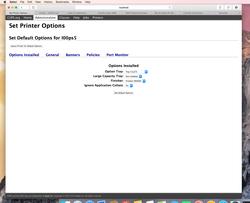
In the next screen you see the preconfigured options for the printer. As these are part of the preconfiguration you should not change anything but just confirm the configuration by clicking ' Set Default Options' at the bottom of the page.
If you are really sure you know what you are doing you can of cause change some of the predefinitons as you like. Please inform us if you find any misconfiguration in this screen !
")
Use the Printer
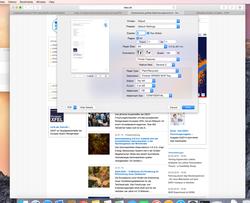
The installed printer(s) should now show up in the usual OSX printer dialogue.
Depending on the type of printer you use the option and the printer dialogue will look different.
Click 'Show Details' in the left bottom corner of the printing screen to open the more sophisticated part of the printer options.
The individual printer features are then discovered by choosing 'Printer Features' in the drop-down list in the middle right of the dialogue usually named after the application you use (e.g. 'safari' or 'preview').
The options are usually divided in 'Feature Sets' that you can choose in the drop-down list.
")