
URL: https://it.desy.de/e5/e3664/e3760/e3966/index_eng.html
Breadcrumb Navigation
🚧Printing from Windows 11 ( unter Contractions ) 🚧
Printing from the DESY guest network and Eduroam
General:
Printing from the guest network is done using the LPR protocol and a driver that must be installed and configured locally (according to the printer's equipment options).
Quick guide:
- Creating a printer as a TCP/IP device
-
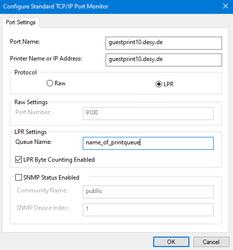
Host and port name for guest network/Eduroam: guestprint10.desy.deFor a PC in the DESY network that is not part of the DESY domain, instead: spool-lpr.desy.de
-
User defined settings for device type
-
Leave port name and printer name unchanged
-
Queue name: enter name of DESY print queue (see list of guest printers)
-
Protocol: LPR, enable LPR byte counting, leave SNMP status disabled
-
Specific model driver for Adobe Postscript: Download from manufacturer (see list of guest printers)
-
Select driver file (.inf) via disk button
-
Select correct model from correct manufacturer
-
Configure options of the device and Adobe Postscript as ducker language
Instructions with screenshots and hints:

")
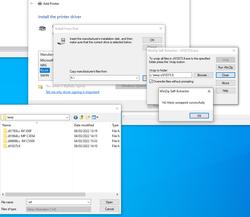
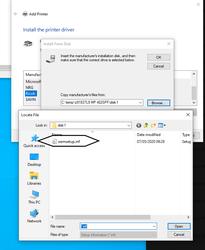
First of all, search for the appropriate driver of the manufacturer via the link in the printer list and unpack it on your Windows PC into the suggested directory (usually c:_tmp\<something>). Please remember or write down the selected directory.

")

")
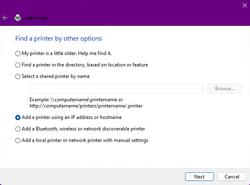
- Device type: TCP/IP device
- Host name or IP address: guestprint10.desy.de
- Port name: guestprint10.desy.de
In case the PC is in the DESY network but is not part of the DESY domain, please replace the hostname and port name by: spool-lpr.desy.de
Remove the checkmark from "Query the printer and automatically select the driver to use".

")
Printing from the DESY guest network and Eduroam
General:
Printing from the guest network is done using the LPR protocol and a driver that must be installed and configured locally (according to the printer's equipment options).
Quick guide:
- Creating a printer as a TCP/IP device
-
Host and port name for guest network/Eduroam: guestprint10.desy.deFor a PC in the DESY network that is not part of the DESY domain, instead: spool-lpr.desy.de
-
User defined settings for device type
-
Leave port name and printer name unchanged
-
Queue name: enter name of DESY print queue (see list of guest printers)
-
Protocol: LPR, enable LPR byte counting, leave SNMP status disabled
-
Specific model driver for Adobe Postscript: Download from manufacturer (see list of guest printers)
-
Select driver file (.inf) via disk button
-
Select correct model from correct manufacturer
-
Configure options of the device and Adobe Postscript as ducker language
Instructions with screenshots and hints:
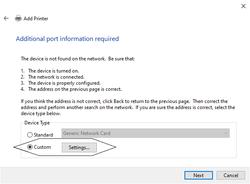
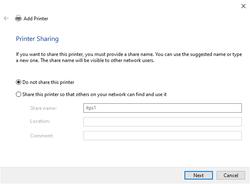
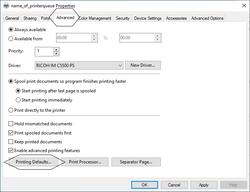
Please select the option "Custom" and click on "Settings ..."

")

")

")
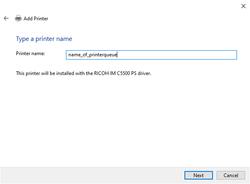
Enter the desired name of the printer in your Windows. We recommend that you use the DESY printer name to avoid confusion.

")
")

")

")

")
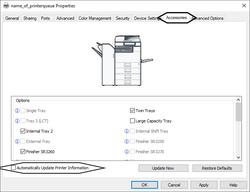
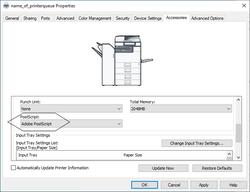
In the "Accessories" tab next to the equipment options of the device, please select the option "Adobe Postscript" for " Postscrpt".

")

")
First of all, search for the appropriate driver of the manufacturer via the link in the printer list and unpack it on your Windows PC into the suggested directory (usually c:_tmp\<something>). Please remember or write down the selected directory.

")
")
- Device type: TCP/IP device
- Host name or IP address: guestprint10.desy.de
- Port name: guestprint10.desy.de
In case the PC is in the DESY network but is not part of the DESY domain, please replace the hostname and port name by: spool-lpr.desy.de
Remove the checkmark from "Query the printer and automatically select the driver to use".
")
Please select the option "Custom" and click on "Settings ..."
")
")
")
Enter the desired name of the printer in your Windows. We recommend that you use the DESY printer name to avoid confusion.
")

")
")
")
In the "Accessories" tab next to the equipment options of the device, please select the option "Adobe Postscript" for " Postscrpt".
")
")