
URL: https://it.desy.de/services/xwiki/faq/Pilot_Abgabemeldung_eng.html/@@siteview
Breadcrumb Navigation
Frequently Asked Questions
This page is currently under construction and will be expanded, especially during the introduction of XWiki.
Should your question not be answered here feel free to contact the DESY XWiki migration team (e-mail: xwiki.service@desy.de).
Known Issues
A list of known problems and its status can be found on the following page:
https://xwiki.desy.de/xwiki/bin/view/_Known Issues/
FAQ
General questions:
First Steps - Where can I get an introduction?
To familiarize yourself with the interface, functions, and page structures, we recommend the User Guide on the official XWiki website as a starting point. Here you will get a first overview of the service and its basic functions.
Will public content still be accessible worldwide after 15.02.2024?
Due to security risks, DESY-Confluence will no longer be accessible via the Internet from February 15, 2024. However, DESY-IT will offer a possibility to continue to make content available worldwide via the Internet. Details can be found on the following website:
https://it.desy.de/dienste/xwiki/voruebergehend_oeffentliche_confluence_inhalte
I can’t find an account that I want to authorize - What is the reason?
Please note that an account is only available in XWiki once it has been logged into the service at least once. So if you want to authorize an account but can’t find it, ask the person concerned to log into the service first. Afterwards, you should be able to find the account.
How do I change the appearance of my page?
XWiki offers Site-Admins and Creators the opportunity to change the theme of the page (this will change the Panels to the left and right of the center). Changing the theme of a page also consequently changes the themes for the child pages. To change a theme, proceed as follows:
- Click on the three dots at the top right of the page -> “Manage Page” -> “Look & Feel”
- Select a theme you would like to use
- The theme will now be set.
How do I create a new Space?
For the time being, new Spaces will only be created by sending a request to xwiki.service@desy.de. This is to ensure that there is no duplication of names during the migration.
Please provide us with the following information:
- Spacekey (3-5 characters) - Will be visible in the web address
- Account names of the users whoc shall get admin permissions
- Do you need a Blog?
Why can I see Personal Spaces from other users? Is my personal Space also visible?
Personal Spaces that are publicly visible are explicitly configured this way. It is not the case for all Personal Spaces.
This was already the case in Confluence but in XWiki it is much more noticable because the spaces are much more present.
If you are unsure about the rights and visibility in you space, we recommend checking the rights via the "Page Rights Viewer" (found on the 3-dots-menu on the top right).
How do I create a page template?
To create a template you require Admin-rights.
Should you not have Admin rights please create a page pursuant to your wishes (a dummy)
and contact an admin.
Detailed Instructions can be found here under “Content”
Integrate Blogs or BlogPosts into XWiki
Set up the Macro:
To integrate BlogPosts into a XWiki-page, the Macro "Blog Post List" should be used.
More information is available on the official Macro-website:
https://extensions.xwiki.org/xwiki/bin/view/Extension/Blog%20Application#HBlogPostListMacro
1. To insert the Macro, select "other Macros" via the "+":
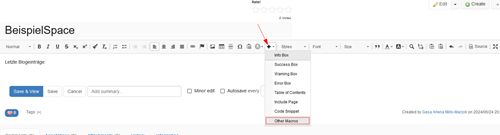
")
2. Search for "Blog" and select "BlogPostList":
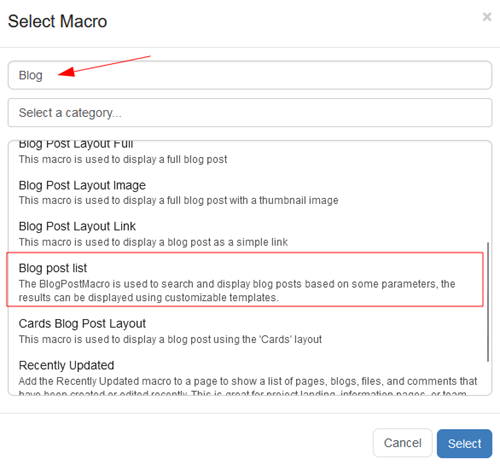
")
3. Configure the Macro:
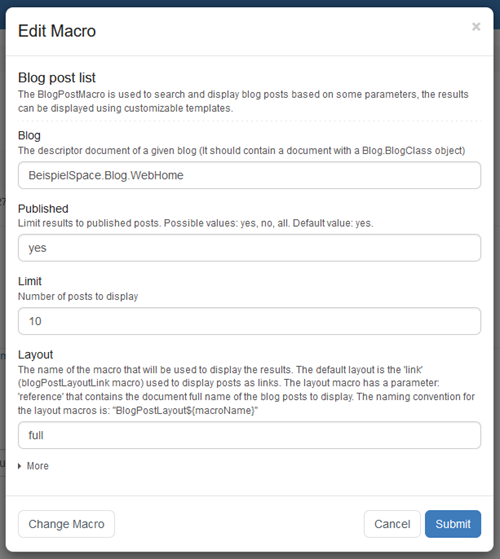
")
Include Macro through Source
The Macro can also be enabled on a page through Source:
Syntax:
{{blogpostlist blog="Blog.WebHome" category="Blog.News" published="yes" layout="full" layoutParams="displayTitle=false" limit="10" /}}
The parameters have to be adjusted. See the official XWiki page for help:
https://extensions.xwiki.org/xwiki/bin/view/Extension/Blog%20Application#HBlogPostListMacro

")
How do I find the correct path for the parameter "Blog"?
Go to the page "Blog" in your space and select the three dots besides "Create".
Here you can view the page-information under "Information".
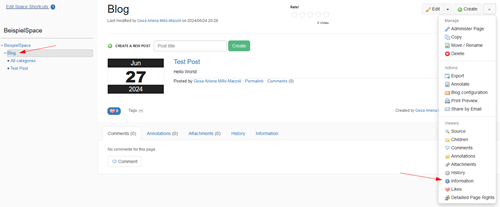
")
Copy the page reference here and paste it into the Macro.

")
How do I create Blog posts for my space?
In XWiki, the blog functions are controlled via the 'Blog Application'.
To create a blog area independent of the standard blog, you must have admin rights. If you have any questions or problems, please contact the IT helpdesk (e-mail: uco@desy.de, phone: 5005).
With admin rights, you must access the URL https://xwiki.desy.de/xwiki/bin/view/Blog/Management.
New blogs can now be created here and their storage locations can be specified.
A few steps are required to add the blog entries to a page:
- Edit the page
- Select a macro via the + (e.g. BlogPostLayoutFull)
- Enter the reference (syntax: Superfolder.BlogFolder.BlogTitle )
The blog post must be 'publish' for this!
In the Dashboard, the blog macro can be added via 'Add Gadget'.
Please note the permissions of the various parent folders.
How is a table colored in XWiki?
In XWiki, a table can be created in different ways and colored differently accordingly:
If the table was created using the "Table button":

Right-click on a cell to open the table properties under "Table Properties". Click on "Advanced" to make settings in the "Style" field in HTML syntax, e.g. background-color:yellow .

To color individual cells or individual rows, select the corresponding cells and then right-click "Cell" -> "Cell Properties". The desired color can now be entered in the "Background Color" field.


If the table was created using the "HTML" macro:

Now the color can be set in the source code using HTML!
For one cell:

For the background of a table:

The cell color overwrites the color of the background.
Another way to create tables in XWiki is via the Velocity macro. This works in a similar way to HTML.
You will find very helpful documentation on the subject of tables hier.
How do I link within XWiki?
To link a page to another page, you must edit the page (which is to receive the link):
- Click on "Edit"
- Click on "Link" in the menu bar
-

- A dialog box opens via the "Link" button
- The display text (if not previously selected in the text) can be entered here
- The page to be linked is then selected via the page symbol under "Page"
-

- If you want to link attachments, a URL or an e-mail address, click on the drop-down menu and select.
-

- The page to be linked can now be selected via a navigation tree and then appears under the "Find a page..." field.
- Finally, the changes on the page must be saved.
How do I add Page-Shortcuts to a space?
To create Shortcuts (direct links) to specific spaces and show them on the top left above the "Navigation" Panel, a special page has to be created. This is only possible for users with "Edit"- or "Admin"-Rights for the specific space.
The page can be created via the "Edit Space Shortcut" button on the left, or by manually creating a page via "Create".
Important: The page has to be called "Space Shortcuts" with this exact wording and it must be a direct child page of the root Space-page.
The View- and Edit-Rights of this page can be configured normally to restrict certain users to access the Shortcuts. By default they are visible to all users.
Inside of the "Space Shortcuts" page, it is now possible to create links (or normal text). Everything on the page will then automatically displayed on the Shortcuts-section on the top left of the page.
Link can be created by typing a square bracket, followed by the name of the page you want to link to:

")
After creating the link, it can be edited by right-clicking it and selecting "Edit Link" to either edit the displayed text, or the linked page:

")
Questions about migration
There are red outlines in my Code snippet. How do I change this?
When migrating a space from Confluence to XWiki, it's possible for some Code-elements to have a red outline.
For example:

This happens when the parameter "Language" is left empty when migrating from Confluence.

This can be corrected by changing the settings of the "Code Snippet" Macro.
To do this, click on "Edit"

and then double-click the Macro:

Now the field "Language" needs to be set to "none"

Now all Code-elements should not have an outline anymore.
The Confluence Space has been migrated, but there are formatting issues
This could be caused by line-breaks which are now at an incorrect position, or by a shifted textblock.
A Desy-template to correct these kinds of issues is already in the works. This might take a while.
A Link to a different Page/Space does not work after migrating.
Some links can break while migrating to XWiki. This could happen if the linked page/space was (not correctly) deleted.
In this case the link only requests you to create a new page:

")
In this case, please contact the corresponding space-administrator.
Are any changes of my spaces in the test-instance saved?
Changes in the test-intance are not saved. During the migration process, all data is taken directly from Confluence, so if you'd like to make some changes to your space you have to do so directly in Confluence.
New pages appeared in my space after migration. Where do they come from?
All tasks in Confluence automatically create new pages in XWiki after migration.
They are called "Task_xx" (xx is equal to the Task-number).
Macros concerning:
Please note that some Confluence-Macros have no equivalent in XWiki or sometimes work a bit different. Below you'll find some solutions to known problems concerning macros.
To edit a macro, hover over it until its border turns yellow and then double-click it.
THe "Edit Macro" menu should open in which you can edit a macros properties.
Which macros are only supported during the migration?
The following macros are only available during the Confluence migration:
- Attachments
- Balsamiq
- Confluence Gallery
- Contributors
- Drawio
- Excerpt
- Excerpt-Include
- Gliffy
- Mathblock
- Mathblock-Ref
- Mathinline
- Mockup
- Pagetree
- Profile Picture
- Tip
- Time
Source: https://store.xwiki.com/xwiki/bin/view/Extension/ProMacros/
The "toc" Macro produces an error after migrating.
When migrating a page from Confluence to XWiki, the Macro "toc" can lead to an error:

")
To recognize when the Macro starts and ends, there need to be 2 empty lines before and after itself.
The easiest way to fix this, is with the XWiki Code-Editor:

It is also possible for the Macro to change the formatting of following text (but no content is lost):

")
The necessary lines can now be added by pressing Enter. The formatting of the following text can be adjusted too:

")
If the toc-Macro does not start at the beginning of the page, 2 empty lines have to be added before the Macro as well:

")
After saving the page, the Macro works correctly:

")
A "noformat" - Error appears after migrating.
After migrating a space, it is possible for the Confluence Code is not displayed correctly. A "noformat"-Error appears:

Now the page has to be edited and the "noformat" has to be changed inside the "Wiki" / "Source"-View:

")
In most cases, changing the "noformat" to "code" solves the issue:

")
How do I fix other "Unknown macro: .... " error?
There are some macros that no longer work in XWiki and therefore need to be replaced with an XWiki macro. You can find a list of known alternatives on the following website:
https://xwiki.com/en/confluence-macros-alternatives/
If you have any questions about this or encounter problems when setting up the macro in XWiki, please contact the IT helpdesk (E-Mail: uco@desy.de, Tel: 5005).
How do I fix the error "Unknown macro: livesearch"?
The "livesearch" macro provides a text field that can be used to search for a specific area of the wiki. In XWiki, the macro to be used for this is called "Location search". Please proceed as follows to insert the location search macro:
- Go to the editor mode of the page
-
Navigate to the position where you want to insert the search field, e.g. just above the error message

-
Click on the plus sign at the top of the editor and select "Other Macros"

-
Search for the macro "Location Search" and select it.

-
Then enter the starting point of the search in the "Reference" field. In many cases, you will want to search the thematically related wiki pages. In such a case, use your main page. Example:
The web address of the current page could be as follows:
https://xwiki.desy.de/xwiki/bin/view/Noch%20ein%20Test/Noch%20eine%20Test%20Subseite/
If the starting point for the search is the main page, just copy the name of the first page. This is shown here in red. Copy the name including any special characters etc. and paste it into the "Reference" field.
If the starting point should begin with the subpage instead, take the name of the subpage (here: "Another test subpage") from the web address as well - in such a case, it is important that you replace the slash with a dot. In relation to the above example, this would mean that the content of the "Reference" field at the end must look as follows if the starting point of the search is to be the subpage:
Noch%20ein%20Test.Noch%20eine%20Test%20Subseite

- Click on Submit.
- If everything looks and works satisfactorily, remove the error message from the old live search macro.
What do I do if the 'page tree' or 'page tree search' no longer works after the migration?
The XWiki Macro "Document Tree Macro" is a good alternative. the 'Children Macro' is part of this and complements the Document Tree Macro. Comprehensive instructions can be found in the Document Tree Macro.
The macro 'create from template' no longer works after the migration?
The function to create a template is integrated in the standardized XWiki.
When creating a new page, the desired template can be selected on the 'Create Page'. Both the prefabricated and the self-created templates are displayed here.

The Confluence macro 'favpages' throws an error message.
The 'Like' function is pre-installed in XWiki and is therefore no longer required via an extra macro.
The error message of the incorrectly imported macro can therefore be removed.
At the bottom of a page you can now find a heart to click on.

After clicking, a confirmation message appears that the page has been liked and the heart is no longer highlighted in blue.
The Confluence macros 'mathinline' and 'mathblock' are only migrated.
The Confluence macros 'mathinline' and 'mathblock' are only available during the migration.
After migrating the data from Confluence to XWiki, these macros will no longer be available.
If you have any questions or problems, please contact the IT helpdesk (E-Mail: uco@desy.de, Tel: 5005).
The macro 'content by label' returns an error.
Unfortunately, there is currently no XWiki macro that replaces 'content by label'.
The Confluence macro 'popular label' causes an error after migration.
The macro 'popular label' is no longer available on XWiki, but the macro 'Tag Cloud Macro' is a good alternative.
How to use it, the possible parameters and application examples can be found here.
The 'details' macro outputs an error after the migration.
Unfortunately, there is currently no XWiki macro that replaces 'details'.
If you have problems reading your data, please contact the central DESY IT-Helpdesk (E-Mail: uco@desy.de, Tel: 5005).
The Confluence macro "collapsible-panel" returns an error.
Unfortunately, there is currently no equivalent to the "collapsible-panel" macro in XWiki.

However, the content has been migrated. To access the data now, you must edit the page.
Now the page will probably be in WYSIWYG mode (you can see the page as it will be displayed later).
To change this and get the data out of source mode, you should click on the error message so that
the action bar appears at the top. Click on "Source" to change the display.

If you had previously selected the faulty macro, the code output including the content will now be selected.
The Macro 'tasks-report-macro' outputs an error after migrating.
The Confluence Task-Macro is currently not migrated correctly. The corresponding error message looks like this:

")
An alternative via XWiki is available, but has to be configured manually, as described in the following steps:
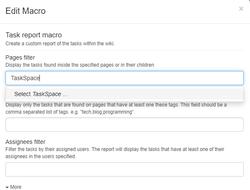
1. Change the Macro to the XWiki-Macro "Tastk report macro" through the button "Change Macro". The Macro can be found through the search-bar on the top.

")
2. Page filter has to be set again. All appropriate pages have to be selected.
With "Status filter" it is possible to make only certain tasks visible. For example "in Progress" only shows non-completed tasks.

")
3. If everything was set up correctly, the page should look like this:

")
Do I have to convert my diagram after the migration?
Diagrams are turned into PNG previews during the migration process. It is possible to convert the diagram into a "XWiki"-Diagram afterwards. This is only necessary if the diagram needs to be edited.
No further action needs to be taken if the diagram should just be displayed normally.
How do I create tasks and how do I manage them?
Creating Tasks
To implement Tasks into XWiki, the Macro "Task" is used.
By typing "/task", there are multiple options shown. Select "Task" to create a new Task:
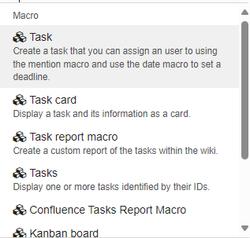
")
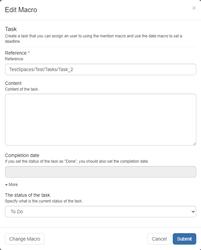
A new window (Edit Macro) appears. Here you can set parameters for your Task.
Important are the options "Content", to give the Task a description, and "The Status of the Task", to set the current status. The status can be set to Done, In Progress or To Do.
If the status is set to "Done", you can set an optional timestamp with "Completion date" to mark when the Task was completeted.
")
Manage Tasks
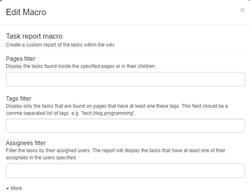
To manage multiple tasks, the "Task report macro" can be used. With this, any number of tasks can be listed.
By default, this macro lists all tasks of the whole XWiki-instance. To only show specific Tasks, a page-filter has to be set first. By this, only Tasks from specific pages are shown.
")
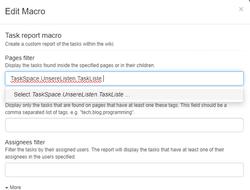
The filter has to be set as follows:
First, enter the space name, followed by the sub pages (separated by dots!).
Example:
If you want to list all Tasks from the page "TasksListe" (Task List), which is a sub page of "UnsereListen" (Our Lists), which itself is in the space "TaskSpace", the parameter you would have to enter is: TaskSpace.UnsereListen.TaskListe
")
Of course it is also possible to enter only a space, without any sub pages. In this case, all Tasks contained within the space are selected.
")
Additionally, there are further filters inside the Task report macro, such as the Status-filter, so you could only show tasks which are already completed.
Rights concerning:
The Right-structure in XWiki is similar to the one in Confluence. Rights can be inherited downwards. They can be restricted further, but can also be set per page and then made accessible via links to higher-level pages.
Generally this makes the system more flexible.
Following Rights can be set inside of a Space:
- "View"
- "Comment"
- "Edit"
- "Script"
-
"Delete"
and -
"Admin"
Important! Admin-rights assigned in a Space can't be denied elsewhere. (You can't deny certain rights to Space-Admins to override them)
How does the rights structure work?
In XWiki, the rights structure works in a similar way to Confluence; here too, the rights can be inherited downwards. They can be restricted further and further, but can also be set per page and then made accessible via links to higher-level pages. This basically makes the rights structure more flexible.
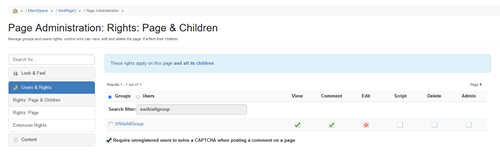
To change the settings of a page, you must click on the relevant page. Click on :
- "more Actions"
- "Administer Page"
- "User & Rights"
- Decide whether only the rights of this page "Rights: Page" or also the rights of the subpages "Rights: Page & Children"
- Now authorize corresponding user groups and/or individual users
An illustrated step-by-step guide to assigning rights for groups and users can be found at hier.
More on the individual rights (view, comment, edit etc) can be found at hier.
How does inheriting rights work in XWiki? (Example)
An example for right inheritance in XWiki:
Initial situation:
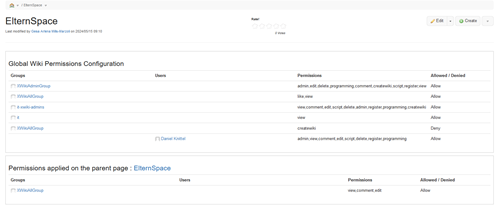
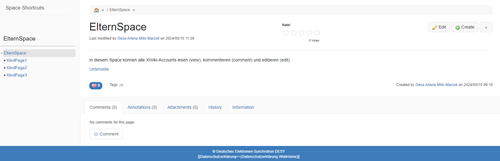
In the example-Space "ElternSpace" ("ParentSpace"), all XWiki-Accounts (Group: XWikiAllGroup) have "View", "Comment" and "Edit" rights.
")
We create the sub-pages Kindpage1 (ChildPage1), KindPage2, KindPage3 and KindPage4.
If the sub-page inherits all rights:
If (like it is in (indPage1) no explicit rights are set, the page inherits ALL rights of "ElternSpace". In this case, the Group XWikiAllGroup is still able to view, comment and edit the page.
In "Detailed Page Rights", the page "KindPage1" only shows up as a title and does not show any specific rights. This only indicates the inheritance from another page (In this case "ElternSpace"):

")
If a right is "implicitly" restricted (recommended!):
This is the most frequent case: Right now, "KindPage2" inherits the view, comment and edit rights from "ElternSpace". These rights are being overridden if they are manually changed in the page settings.
If a user recieves edit-rights on "KindPage2", all members of the group XWikiAllGroup lose them. Because the user got the view and comment rights as well, the group has to get these rights as well.

")
If a right is "explicitly" restricted (not recommended!):
The edit-rights of XWikiAllGroup are explicitly denied on "KindPage3".

")
We get the following state of "KindPage3"'s rights:
")
This is only usefull in very few cases, and XWiki recommends only using "implicit" restrictions.
If all rights are overwriten:
As mentionend in "KindPage2", the inherited group (in this case XWikiAllGroup) DOES NOT have to be part of the sub-page. In this case all old rights (view, comment and edit) are given to the group "IT". Now XWikiAllGroup has no access to this page at all (and is not visible to XWikiAllGroup as well).

")
Access via links:
A page can have permissions for someone, who does not have any rights for the parent-page.
Example:
"KindPage4" has an "UnterKindPage" ("SubChildPage") to which the group "XWikiAllGroup" has access. A user who has edit-rights on "ElternSpace", as well as (at least) view-rights for "KindPage4" and "UnterKindPage" can now create a link to "UnterKindPage" inside of "ElternSpace".
The link to "UnterKindPage" has to be added as follows:
1. Edit "ElternSpace" and add link:
")
2. Adding a DisplayText:
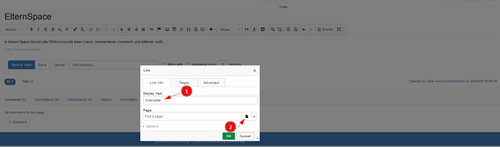
")
3. Select page and save:
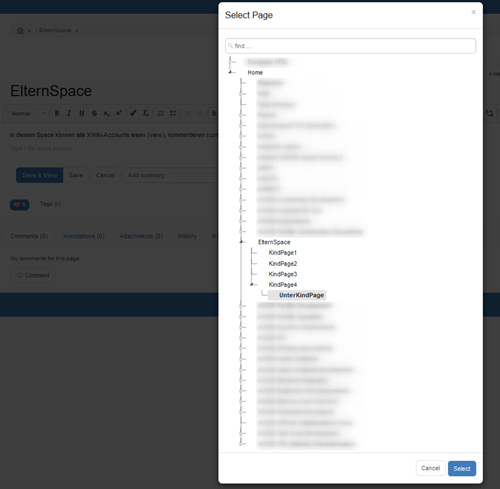
")
View of a user, who does not have rights for "KindPage2":
Neither "KindPage4" nor their sub-page "UnterKindPage" are visible to the user.
")
When a user opens the link, he gets redirected to "UnterKindPage".
In the navigation-menu on the left, neither "KindPage4", nor "UnterKindPage" are displayed but they are visible in the path-display above the page-title.

")
In what form are the rights transferred from Confluence to XWiki?
With the migration, every Confluence administrator of a space will also receive administration rights for the migrated space in XWiki.
In addition, it is possible in XWiki to assign individual rights (View, Comment, Edit, Script, Delete, Admin) to entire "groups". At this point, we recommend mapping the role of the administrator via such a group. The rights can exist either for the current page only or for the current page and all its subpages.
Example image of an administration page:

If, in addition to the migrated administrators, administration rights are still required for individual colleagues, this can also be done on an individual basis as before.
Very good documentation can also be found at XWiki: hier.
Is there an overview of the authorized persons of a Space?
There is a (preliminary) view to better understand which user or group has rights for the respective space. This view is still "preliminary" because it is still being worked on, so there may still be external changes.
To get this view, select the relevant Space and click on the drop-down menu in the top right-hand corner of the Space:

Here you can use the lowest point "Detailled Page Rights"

Get an overview of authorized
group / user / respective rights
How can I deny rights to certain users?
Rights can be specifically denied to certain users/groups.
To do this, click the corresponding checkbox twice, until a crossed out, red circle appears. You can find a detailed guide on changing rights here.