URL: https://it.desy.de/services/druck/macos/add_printer/@@siteview
Breadcrumb Navigation
MacOS - Add printer
Advantage of this type of printer set up:
- This type of printing from the Macintosh does not require a cups server. So you do not need to know whether and on which CUPS server at DESY the respective printer is available.
- Print description files (PPD) intended by the manufacturer specifically for the Macintosh platform are used.
- The first and important step is to find out which Ricoh model is the printer, please ask the secretary of your group, or check what is marked on the printer.
Steps to follow:
- Download the driver intended for the particular printer model from the printer manufacturer's website.
- For Ricoh-Printer: Treiber-Download
- For HP-Printer/Plotter: Treiber-Download
- For the plotter pubcp4a0plotter please search for "HP DesignJet Z6 PostScript Printer Series" on the driver website.
If the driver is presented as a .dmg format file, you will need to download it, open the .dmg image and run the installer it contains (usually a .pkg file) and complete all the installation steps.
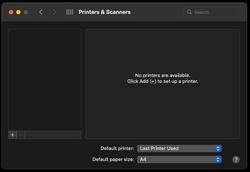
- Open the System Preferences on your Macintosh and select the "Printers and Scanners" section (see Figure 1).
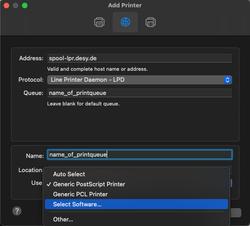
- In the upper row, select the middle icon for an IP printer (see Figure 2).
- Enter the following under "Address
- Protocol: Select "Line Printer Daemon - LPD".
- Queue: specify the name of the printer queue you want to use (e.g. "pubps1" for the b/w queue of our public pool printers).
- Name: enter the name of the printer queue as well.
- Use: please select in the pulldown menu: "Select software".
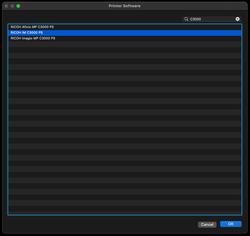
- A folder containing all drivers installed on your Macintosh will be displayed (see Figure 3).In the upper right corner, you can filter the list by entering the printer model name. For example, you can enter "C3000" for a Ricoh IM C3000.
- Select the entry in the list that corresponds to your printer model. When in any doubt, always select the entry with the suffix "PS" or "Postscript".
- After you have selected the model, click "OK" at the bottom right.
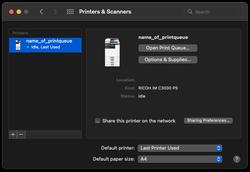
- Which options the printer has in general (e.g. a finisher)
- And which options you want to use for the respective print job (e.g. which paper tray, whether b/w or color).
Tip :
The standard layout of the paper trays of large multifunction devices at DESY is as follows:
Tray 1: green/blue paper for cover sheets.
Tray 2: A3 white
Tray 3: A4 recycling for b/w printouts
Tray 4: A4 white for color printouts


