URL: https://it.desy.de/services/messaging/faq/@@siteview
Breadcrumb Navigation
FAQ
Recommended first steps in Mattermost
The following first steps are recommended in Mattermost
- Adjusting the notification settings (e-mail or push notifications)
- Joining the desired teams
How do I change the language?
Please log in with your DESY account name and DESY password on the page https://chat.desy.de.
Now click on the gear wheel in the upper right corner. (Figure 1)
Now click on "Display" and then on "Edit" at the bottom of the field. (Figure 2)
Select the desired language in the "Change language" drop-down menu and save your entries by clicking on the "Save" button. (Figure 3) You have now successfully set your desired language.
Where are the notification settings?
The notification settings can be found under Settings (Figure 1).
The "Notifications" tab must then be selected in the "Settings". There you will find settings for e-mail and push notifications, among others. (Figure 2).
When Team, when Channel?
Before a team is requested via the UCO, it should be considered whether one or more channels are sufficient. A team makes sense if a larger group of people wants to exchange information and at the same time several subgroups are active within this group. The subgroups can then be represented as channels within a team.
When applying for a team, please include the size of the team in your request to the UCO, as well as a short reason for the necessity.
How do I join a team?
The status of the team - "public" or "private" - determines the procedure or the possibilities to join a team.
Joining a public team
Please log in with your DESY account name and DESY password on the page https://chat.desy.de.
Now click on the "+" sign in the navigation bar on the left. (Figure 1)
Note: This option will only be shown to you if there are also public teams you could join.
You will now see a selection of public teams that you can join. Click on the team you want to join. (Figure 2)
Joining a private team
To join a private team, there are the following possibilities:
- You will be added by the team administrator
- You have received an invitation link. Via the link you can join the corresponding team.
How do I create a channel?
To create a channel within a team, click on the small "+" to the right of "DESY" in the navigation bar on the left side of the screen. (Figure 1)
Anyone who is part of the team can join a "Public" channel without needing an invitation. In contrast, only members of the team can join a "Private" channel if they are invited to do so.
In the following window you can now enter the details of the desired channel. (Figure 2)
A "Public" channel can be joined by anyone who is part of the team without requiring an invitation. A "Private" channel, on the other hand, can only be joined by members of the team who are invited to do so.
After the channel is created, 1-2 additional persons should be entered as "channel administrator". Otherwise, if the admin accidentally leaves the channel, it will not be possible to add other people.
To do this, select the channel, click on the small arrow next to the channel heading. Here you can now manage the members of the channel or add new ones.
To assign the role of "channel administrator" to a member, click on "Manage members".
(Figure 3)
I can't find all colleagues
If not all desired colleagues can be added when creating a channel, this can have several reasons:
- The person you are looking for has not yet logged into the system.
- The person you are looking for is not part of the parent team.
What about external partners?
Currently, it is not possible to log on to the system without a DESY account.
Due to the limited number of licenses in the current version, the service is primarily aimed at DESYans.
We are planning a workshop / conference - can we use Mattermost for it?
As part of HIFIS, a Mattermost is available at https://mattermost.hzdr.de. The participants can login to this service via the Helmholtz AAI. There you can create a team and invite members for a workshop.
Are there any restrictions in the chat?
Yes - Attachments must not be larger than 15 MB at present (8.4.2020)
Also the maximum characters in a single message are 16383.
What does "Archive Channel" mean?
Channels that you have created yourself or for which you have been granted administrative rights can be archived. To do this, the option "Archive Channel" must be selected.
This removes the Channel for all registered users and it is not possible to create a channel with the same name again.
Can I delete a channel?
Currently it is not possible to delete a channel permanently by yourself. The channel can only be "archived" by channel administrators. (See "What does archiving a channel mean?")
If you want to delete a channel, please contact the UCO and tell us the name and the team in which the channel is located.
Collapsed Reply Threads
In order not to lose the overview in a channel, there is now the new feature "Collapsed Reply Threads".
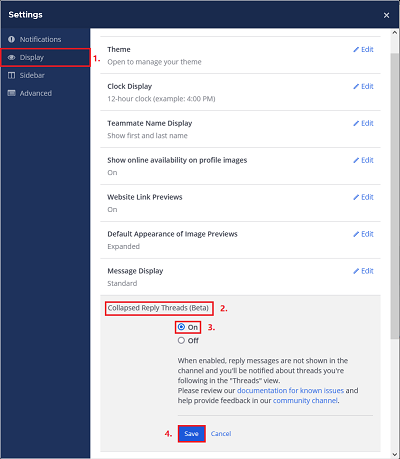
In order to use this feature, it must first be activated. To do so, open the settings via the gear in the upper right corner (Figure 1).
Click on "Display" and select the "Collapsed Reply Threads (Beta)" item. Turn it on and save the settings. (Figure 2)
The feature is now activated.
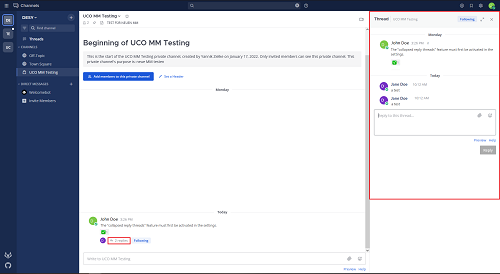
When one or more replies are given to a message, they are minimized and can be expanded if necessary by clicking on the reply itself, or on the "Reply" button. On the right side of the screen, the thread will now open. (Figure 3)
The "threads" can also be followed so that the different threads can be accessed more easily.
To do this, click on the "Follow" button or on the three dots that appear on the right when you hover over a message.
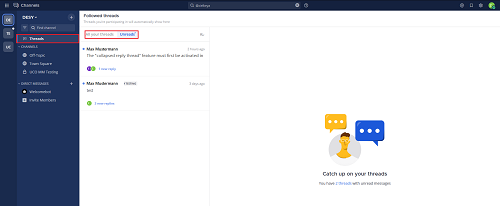
By clicking on "Threads" in the navigation bar on the left side of the screen, you can view all the threads you have followed. You can also filter by only unread messages. (Figure 4)
New messages in a thread are always indicated by a blue dot.
If you want to mark an already read thread as "unread" again so that it stands out, you can do this either by clicking on the three dots and then selecting the option, or by using the ALT+left-click key combination.
How do I create a Mattermost Bot?
Please send an email with the following information to uco@desy.de :
- Team (default "DESY"):
- Name of the channel (please create this beforehand):
- Name of the bot user:
-
Brief description of what the bot will do:
The Helpdesk will then forward this information to the responsible service operators. You will subsequently receive a webhook that you can use for your project.


