URL: https://it.desy.de/services/storage_services/desy_sync__share/data_sharing/index_eng.html
Breadcrumb Navigation
Data sharing
There are several things to consider when sharing data with DESY Sync & Share. This manual gives an overview of the different possibilities to share data. It also explains the advantages and disadvantages of the different procedures and what should be considered in each case.
The illustrations used here refer to the view of the DESY Sync & Share website (https://sas.desy.de) in order to clarify the explanations with examples. The views may differ in case of using the Nextcloud Desktop Sync Client.
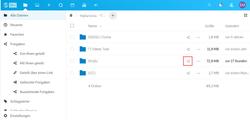
In the web view, you can access the Share dialog by clicking the Share icon to the right of the folder or file name (see Figure 1).
Sharing data with DESY accounts or groups
Directly sharing data with DESY accounts or DESY registry groups is the preferred variant, since the sharing takes place directly with individual persons which makes it easier to recognize and control which person has which access to data in your data area. However, this option can only be used if the group of people with whom you want to share data has a DESY account..
As soon as you have directly authorized accounts and / or groups, they will normally receive a corresponding notification by e-mail about the share that has been made with a corresponding link to the file or folder.
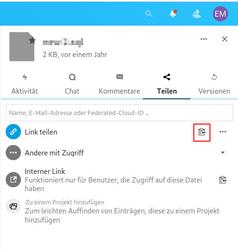
In the case that you want to share a link explicitly with the people you have authorized, you have the possibility to use an internal link. You can copy this link to the clipboard using the clipboard icon to the right of "Internal link" (see Figure 2) and paste it into an e-mail, for example, using Ctrl+V or right-click -> "Paste".
How can I recognize DESY accounts?
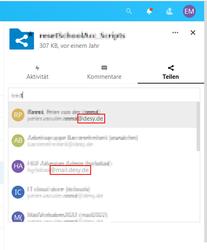
Enter the name of the person with whom you want to share the data in the share dialog of a folder or a file. DESY accounts can be recognized by the e-mail address displayed under the account name. This usually ends with @desy.de or @mail.desy.de (see Figure 3).
How can I recognize DESY groups?
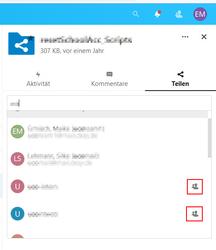
If you know that there is a matching DESY group for the group of people with whom you want to share your data, enter the name in the search field of the share dialog. Groups can be recognized by the fact that only the group name is displayed and an icon with two people is visible to the right (see Figure 4).
In DESY Sync & Share, however, only DESY groups are displayed that are stored in the central directory service LDAP. This service does not provide special groups like "win_admins" or "win_user". If you do not find the expected group, please contact your group administration or the central IT helpdesk (e-mail: uco@desy.de, Tel: 5005).
In some cases, it may be advisable to create a new group for the purpose at hand, which will be filled with the desired group of people. Your group administration can take care of this if necessary.
Sharing data with external institute accounts
If you want to share data with people who do not have a DESY account but have an account in another institute, you can share data with their external accounts. For this purpose, the external collaboration partners must first log in to DESY Sync & Share via DESY Keycloak. This is done via a corresponding button on the login page of DESY Sync & Share (https://sas.desy.de). Afterwards, an account will be created on DESY Sync & Share with the account credentials and can then be selected by you in the share dialog.
If necessary, you can find instructions for logging in with external accounts via Keycloak on the following website:
DESY - IT - First steps with DESY Sync and Share
How can I recognize external accounts?
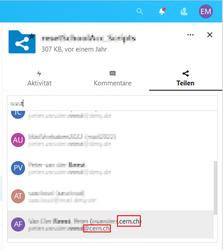
External accounts can be recognized in the share dialog of DESY Sync & Share by the fact that the external account is displayed in brackets behind the full name of the person with the following syntax: Account name followed by a dot and the name range (domain) of the institute. As well as, the institute email address is visible under the person's name.
Sharing data using web links
If the group of people to whom you want to make data available has neither a DESY account nor an external institute account, it is a good idea to create a web link for sharing the data. This way of sharing can also be considered if the group of people is very large and no group exists for them.
Please note that copying the web address (URL) from the address bar of the browser would correspond to the following type ("https://sas.desy.de/index.php/apps/files/?dir=...") may cause errors. Created links can be copied to the clipboard by clicking the clipboard icon and then pasted with Ctrl+V or: right click -> "Paste" for example into an e-mail.
An important reason for this is that you cannot set permissions on these links. Likewise, it is not possible to invalidate such a link. In addition, you cannot access the link if someone else is accessing the data through it at the same time.
Therefore, if you want to share data using a web link, please explicitly use the sharing feature of Nextcloud, as explained in the following section. This function provides a weblink of the type https://sas.desy.de/index.php/s/.......
How do I create a weblink?
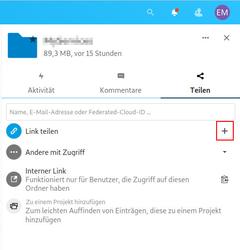
In the Share dialog, click on the plus symbol in the "Share link" line (see Figure 6)
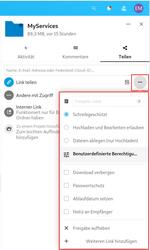
After that, a green check mark and an icon consisting of three dots will appear. By clicking on this icon you can open the possible permission options and actions for this link.
-
Mask the download
Hides both the otherwise available download button of Sync & Share and the download option of the browser.
-
Password protection
Here you can set a password which will be requested when calling the weblink. For public links it is strongly recommended to always set a password.
-
Set expiration dateHere you can set the date on which the weblink will automatically expire.
Special permissions for folders
-
read only
Allow viewing and downloading only.
-
Allow uploading and editing
Allows editing and uploading of data.
-
Drop files
Allows only uploading data, but not viewing any existing data.
Permissions for files only
-
Allow editing
Allows editing the file in addition to opening it.
Copy weblink
Shares
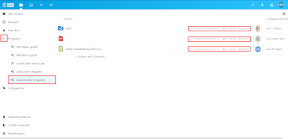
In the web view, you will find the "Shares" item in the left side menu.
If you click on Shares, you will see all the files you have shared as well as all the shares that have been split with you.
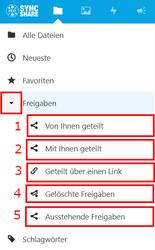
If you click on the icon on the left of "Shares", several sub-options for sharing will pop up. The icon should change to an arrowhead pointing to the right when you move the mouse pointer over the icon, as soon as you click on it, the arrowhead will point downwards (see Figure 9).
Views under Sharing
1. Under the item "Shared by you" you can see all the shares that you have made with other users or groups.
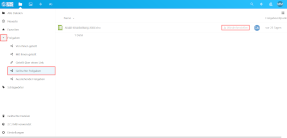
2. Under the option "Shared with you" you can see all the shares that have been shared with your user name or group membership..
3. Under the item "Shared via a link" all shares for which you have created a link for sharing will be displayed. You can check if one or more links to a file have already been created by you and, if they are no longer needed, remove them so that the link becomes invalid (see note on public links)
4. Under the point "Deleted shares" you will find shares that you have left. See also Common problems "How do I leave a share?" or "I left a share by mistake, what can I do?"
5. Under "Pending shares" you can see all the shares of users and groups that have been shared with you. Shares will not appear in the homepage with you until you manually accept them here. See under "Share settings" to accept users and groups by default.
Share settings
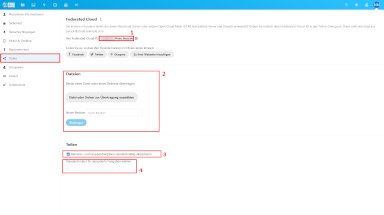
You can find the settings via your profile picture on the top right. Click on your profile picture and then on Settings (see Figure 10).
Click on the "Share" menu item. Different options will be displayed.
1. Under "Federated Cloud" you will see your Federated Nextcloud ID.
2. Under "Files" you can transfer files or folders to a new owner. Select a file or folder using the "Select file or folder to transfer" button (see Figure 11). Im Feld "Neuer Besitzer" geben Sie einen neuen Besitzer ein. Sie können hier nur Account auswählen und keine Gruppen. Ebenso kann maximal ein Account für die Übertragung ausgewählt werden. Die Übertragung wird durchgeführt wenn Sie auf "Übertragen" klicken.
3. Check the box if you want to accept user and group shares by default. This will automatically accept user and group shares and place them in the home directory.
4. User or group shares will be placed in your home directory by default, this is the case if there is only a " / " in the white box. To change this, click on the white box and navigate to a folder under which shares should be stored by default. You can also create a new folder with the plus symbol. The path of the folder is displayed next to the Plus icon. When you have navigated to the folder that you want to be the default folder, confirm with the Select button (see Figure 12). The white field should now show the path to the folder. On the right of the white field there is now an area to reset to the default setting as the path.
Sharing using a client
Please click on a tile to proceed to sharing using your desired client.
To use the mobile app, follow one of the following two instructions based on your device. In both instructions, you will find the sub-item for sharing files and folders under General Information.
Frequently encountered problems (FAQ)
I can't find files that were shared with me - What can I do?
If files have been shared with you, but you cannot find them in your Sync & Share, a manual confirmation of the shared data is required. Go to the web view of the DESY Snyc & Share.
In the left menu, click on the icon to the right of the Shares menu item, this should show a downward pointing arrowhead when you are over the icon with the mouse pointer. A submenu will open. In this you can now see all pending shares under "Pending shares". Here you can now accept file and folder shares.
I accidentally left a share - What can I do?
Generally, you can find deleted shares by clicking on the icon to the left of the "Shares" item in the left side menu and in the following submenu under "Deleted shares" you will find all shares that you can restore. If you click on restore, the resource will be found again in the homepage of your Sync&Share. If this is not the case, the share on the resource may have been revoked and the share must be reassigned to your account.
How can I add resources to my Nextcloud via a link?
If you have a public link, you can also use this link to add the resource to your homepage like a regular share SaS.
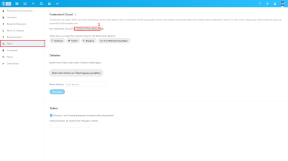
1. First of all you need the Cloud ID of your account. To do this, go to the Settings (under Sharing Settings, see Figure 10). Now click on the tab "Share". You will find under the item "Federated Cloud" and also "Your Federated Cloud ID". This will contain your account name followed by @sas.desy.de (see Figure 17). By clicking on the clipboard icon on the right of your ID, it will be copied to your clipboard and you can paste it with Ctrl+V or right click -> "Paste".
2. If you have a public link that has been shared or sent to you. Go to Link by pasting it into the address bar of your browser (see Figure 18). A page will open with the data shared with you, which you can access depending on the settings of the sharer (under "Sharing data using web links" see Figure 7).
3. Click on the icon in the upper right corner consisting of three dots to open a small window. Under the second point "Add to your Nextcloud" you can enter your Federated Cloud ID from 1. (see Figure 18).
4. Now go to the main page of Sync & Share (sas.desy.de). When you are logged in you will find a bell icon to the left of your profile picture on the upper right corner of the page. The bell is marked with a red dot. Click on the bell and a small window will open asking you if you want to accept the data. Click accept to add the data to your homepage in Sync & Share (see Figure 19). If you don't see the bell icon notification or have dismissed it, you can accept the data under "Pending shares" (under the "Shares" item you will find the instructions as well as Figure 9).
I cannot accept a share - What can I do?
If you click on "Accept share" under "Pending shares" and a message appears that states: "The share could not be accepted". Then the share was left and you look under "deleted shares" to see if you can restore the share first (see also " I left a share by mistake, what can I do?").
A public link cannot be opened - What can I do?
If you get the message "File could not be found" as shown in Figure 22, this is an internal link. To be able to access an internal link, you already need a share for the resource.
If you have access, contact the person responsible. This person should give you a release for the data (see Sharing data with DESY accounts or groups).
If you have tried to use a public link, see Sharing data using web links above.
Common use cases
I want to share a file or folder with a user or group
Via the sharing settings you can authorize accounts or groups for files and folders by selecting them via the search bar (see Sharing data with DESY accounts or groups). Data with accounts outside the DESY instance via Nextcloud can also be authorized by entering the Federated Cloud ID of the account in the search bar (see Sharing Settings). Otherwise, you can create web links and share them (see Sharing data using web links).
Set and manage permissions for individual users or groups.
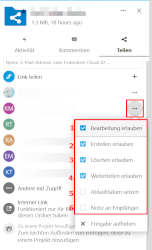
If you are in the share dialog, you can assign shares to DESY accounts and groups for the corresponding resource via the search bar (see Share data with DESY accounts or groups).If you have granted a share for one or more accounts or groups, you can see them in the share dialog. If you click the icon with the three dots on the right of the account or group, you can set privileges for them (see Figure NR). When using a public link, authorizations are applied to the corresponding link. Whoever has access to this link also has the respective permissions for this one. Create multiple links, set the permissions for each, and send them to the appropriate accounts accordingly. You can set the following 6 options for the respective accounts.
1. Allow to edit already existing files.
2. Allow to create new files and folders.
3. Allow deleting files and folders.
4. Allow sharing of files and folders within this share.
5. Set an expiration date of this share for the account.
6. Send a note to the respective account.


