URL: https://it.desy.de/services/uco/documentation/external_access/index_eng.html
Breadcrumb Navigation
Access from external Computers
The Target audience of this documentation are end users.
Introduction
You want to connect from a computer outside the DESY network to a computer within the DESY network in order to work on it? Or you just want to call up internal DESY web pages, but you do not want to connect to your work device at DESY for this purpose?
For such cases, this website offers you general information on how to establish a connection from outside DESY using a so-called SSH tunnel.
💡 We have summarized further questions and the clarification of technical problems at the end of this website for you.
General Questions
Can I use these Instructions if I work at V2 / V3?
For V2 and V3 special technical conditions apply for the connection to computers at DESY. If you work in one of these groups and need to connect to DESY computers, please contact your responsible group administrator, because this documentation is not usable for your use cases without further information.
Instructions for V2 users, instructions can be found on the following web site (only available in German):
https://it.desy.de/dienste/uco/dokumentation/home_office_fuer_v2
Where can I find Instructions for MacOS?
Short instructions on connecting from Mac to Windows devices can be found in chapter "Step-by-Step Instructions". However, you may find additional information on connecting from Mac devices also to other operating systems on the following web site:
https://it.desy.de/services/operating_systems/macos/remote_access/
Which is the Target Computer?
If possible, please use your personal device at DESY as target computer, which you usually use for your daily work and on which you also would like to work remotely.
It is also possible to use the central Windows Terminal Server winterm.desy.de as target computer. However, please use your personal working device preferably, since the Windows Terminal Server has a limited load capacity. It should therefore only be used for short accesses and not for long-term work.
Do I need a Target Computer when I just want to connect to internal Websites?
No, if you just want to connect to internal websites with your local internet program (browser) and do not need to work on a remote computer at DESY, you do not need a target computer. Instead, you have to configure a so called SOCKS Proxy in your browser, which leads the web traffic through bastion, similar to an SSH tunnel.
You can find instructions about configuring a SOCKS Proxy in your browser in the section "Just connect to internal Websites".
Preliminaries - What do I have to do first?
-
Find out the name of your Target Computer
Leave your target computer switched on! How to find out its name is explained on the following website: Computer Name Determination. Without the computer name it won't be necessary to establish a connection to it.
Note: The computername is not or does not only consist of its PCX number (PCX******)!
-
Request Permissions on your Target Computer
To be able to connect to your DESY Windows computer at your office at DESY, please contact one of your responsible Windows group administrators. They are able to permit your user account for a remote connection to your target computer.
Windows group administrators are able to connect to all computers of their group remotely. So they can give you permissions to connect to your computer, even from a distance.
Instructions - How to use an SSH Tunnel?
I want...
... access internal Websites
Note: This instructions were created using Firefox. In other browsers the setup of a proxy is not possible or has not been tested so far.
Step 1 - Establish the SSH Connection
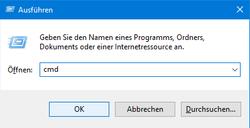
If you are using Windows, press ⊞ Win + R and enter the command cmd, afterwards please click 'OK' to open the Windows command line (Fig. 1).
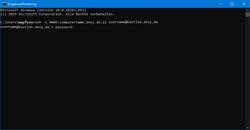
Execute the following command using your command line (Fig. 2).:
ssh -D 2280 username@bastion.desy.de |
Replace username with your personal DESY user name. Then press the Enter key ↵. Enter your password (the entry is not visible) and press the Enter key ↵ again. Please leave the window open, just minimize it if necessary.
Step 2 - Setup the Browser
Start Firefox and open the settings using the menu (☰ -> "⛭ Settings"). Scroll to the bottom. In the chapter "Network Settings" click on "Settings...". Configure the following options and click on "OK" afterwards (Fig. 3):
|
Now you should be able to access internal DESY web sites like https://registry.desy.de using your local Firefox.
Note: After setting the proxy in the browser or system websites belonging to DESY will become unavailable or load significantly longer when the SSH connection is not established. Also this tunnels all your traffic through DESY.
...connect from WINDOWS to WINDOWS
Step 1 - Establish the SSH Tunnel
Press ⊞ Win + R and enter the command cmd, afterwards please click 'OK' (Fig. 1). In the command prompt enter the following command (Fig. 2) and press Enter ↵ :
ssh -L 8006:computername.desy.de:3389 username@bastion.desy.de |
Replace computername with the name of the target computer, username with your personal DESY user name. Then press the Enter key ↵.
Enter your password (the entry is not visible) and press the Enter key ↵ again. Please leave the window open, just minimize it if necessary.
Step 2 - Connect to your Target Computer
To start the Remote Desktop Client, click on the Windows icon in the system tray at the bottom left and enter 'rdp'. Open the remote desktop client by clicking on "Remote Desktop Connection" (Fig. 3).
Enter the following into the textfield "Computer" (Fig. 4):
localhost:8006 |
Click on "Connect" (Fig. 4) and enter your password when prompted. If you receive a certificate warning, confirm this message with "Yes".
Note
When entering the user name for the remote desktop connection, the domain "WIN\" may have to be entered before the user name. If the connection cannot be established successfully, please make sure that your user name is stored in the form WIN\username. To do this, click on "Show options" in the Remote Desktop Connection window (Fig. 4).
...connect from WINDOWS to LINUX with graphical Interface
Step 1 - Install the FastX3 Server on the Target Computer
You can obtain the installation files for the FastX server (for Ubuntu/Debian please use xxx.deb, for other Linux desktops xxx.rpm), as well as the corresponding instructions for setting up the server via the DESY web pages. Please use the latest version of the server, which is available there. If you need assistance in installing the server on a green DESY Ubuntu desktop, please contact the UCO (Email: uco@desy.de, phone: 5005), specifying the name of the target computer.
Central workgroup servers like pal.desy.de already provide a FastX 3 server and can therefore already be used without this step for the connection via FastX 3.
Step 2 - Install the FastX3 Client on your local Computer
The client can be installed using the Software Shop NetInstall / DSM on DESY Windows devices. If you are not using a DESY computer, you may download the client using the DESY web sites. Please use the newest version which is available there.
Step 3 - Establish the SSH Tunnel
Press ⊞ Win + R and enter the command cmd, afterwards please click 'OK' (Fig. 1). In the command prompt enter the following command (Fig. 2):
ssh -L 8006:computername.desy.de:22 username@bastion.desy.de |
Replace computername with the name of the target computer, username with your personal DESY user name. Then press the Enter key.
Enter your password (the entry is not visible) and press the Enter key again. Please leave the window open, just minimize it if necessary.
Step 4 - Connect to your Target Computer
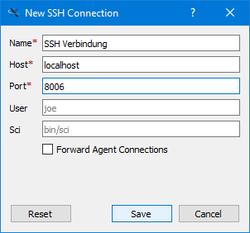
|
- You will be asked to chose the so called "Window Manager", XFCE is the recommended one. As soon as you chose a Window Manager the connection will be established immediately. If it is not offered as an icon for selection, explicitly enter the command startxfce in the lower area of the window.
...connect from WINDOWS to LINUX without graphical Interface
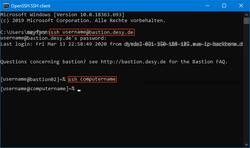
Press ⊞ Win + R and enter the command cmd, afterwards please click 'OK' (Fig. 1). In the command prompt enter the following command (Fig. 2):
ssh username@bastion.desy.de |
When prompted, enter your password and then connect to the desired Linux target computer using
ssh computername |
Instead of username please enter your personal DESY username, instead of computername the name of the computer you want to connect to. Press the Enter key to connect.
When prompted, enter your password and press the Enter key. Please note that the password entry is not visible.
Please note that from outside the DESY network you usually have to connect to bastion.desy.de first and can only connect to other Linux computers afterwards.
...connect from LINUX to WINDOWS
Step 1 - Install a Remote Desktop Client
remmina
As RDP client we currently recommend remmina in the latest version (at least v1.4.3). You can install it on green DESY Ubuntu desktop computers using snap. You will find instructions on the following website:
https://xwiki.desy.de/xwiki/bin/view/IT/linux/Documentation/Group%20Admin%20Documentation/Add%20Software/snap/
Alternatively follow the installation instructions on the official web site:
https://remmina.org/how-to-install-remmina/
xfreerdp
xfreerdp can also be used in principle, but it must be available in version (2.0.0-dev5) (status 04/2020), since older versions cannot establish a connection to up-to-date Windows computers due to incompatibilities.
Step 2 - Establish the SSH Tunnel
Open a terminal and execute the following command. Replace computername with the desired target computer, username with your personal DESY user name. Then press the Enter key ↵:
ssh -L 8006:computername.desy.de:3389 username@bastion.desy.de |
Step 3 - Using remmina to connect to the Target Computer (recommended)
Start remmina and enter the following settings to configure the connection:
- Name: Any you like
- Protocol: RDP
- Server: localhost:8006
- Domain: WIN
Click on "Connect" to establish the connection. Please leave all other settings at their default settings. In particular, it is not necessary to configure a tunnel in remmina, as this tunnel is already created on the command line at the time of connection establishment, and will otherwise result in a connection problem concerning the RDP connection.
Step 3 - Using xfreerdp to connect to the Target Computer
If a connection with remmina is not possible for you, you can alternatively use xfreerdp as RDP client. To do so, open a new terminal window and enter the following command in the command line. Please replace username with your DESY user name first.
xfreerdp /u:username /d:win /v:localhost:8006 /dynamic-resolution |
Alternative to an SSH Tunnel: sshuttle
As an alternative to an SSH Tunnel, you may use sshuttle instead. sshuttle is an application which leads all network traffic through one specific gateway (bastion.desy.de in this case). So this application can be used as good alternative to a VPN conncetion.
-
Install sshuttle using your local Linux package manager or download it from github:
https://github.com/apenwarr/sshuttle - Afterwards execute the following command to establish the connection. Replace username with your personal DESY user name
sshuttle --dns -r username@bastion.desy.de 131.169.0.0/16
- Now you will be able to connect to all internal web sites and services and thus will be able to use Remote Desktop programs without using any specific parameters like local ports. To connect to your personal Windows computer, use the following command:
xfreerdp /u:username /d:win /v:computername.desy.de /dynamic-resolution
Replace computername with the name of the target computer, username with your personal DESY user name.
...connect from MAC to WINDOWS
Install the latest version of the "Microsoft Remote Desktop Client" using the AppStore (Fig. 1).
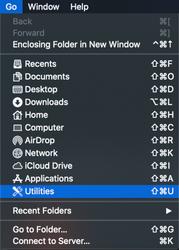
Then open a terminal via "Go" -> "Utilities" (Fig. 2) and select "Terminal". Enter the following command into the command prompt.
ssh -L 8006:computername.desy.de:3389 username@bastion.desy.de |
Replace computername with the name of the target computer, username with your personal DESY user name. Then press the Enter key ↵.
Enter your password (the entry is not visible) and press the Enter key ↵ again. Please leave the window open, just minimize it if necessary.
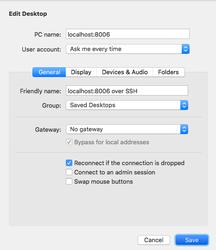
Then start the Microsoft Remote Desktop Client and enter localhost:8006 for the connection as PC name. Afterwards, save and start the connection.
...connect from LINUX to internal Network
sshuttle is an application which leads all network traffic through one specific gateway (bastion.desy.de in this case). So this application can be used as good alternative to a VPN conncetion.
- Install sshuttle using your local Linux package manager. If it is not available there please download it from github: https://github.com/apenwarr/sshuttle
-
Afterwards execute the following command to establish the connection (please exchange username by your DESY account name)
sshuttle --dns -x bastion.desy.de -r username@bastion.desy.de 131.169.0.0/16
|
- Now you will be able to connect to all internal web sites and services and thus will be able to use Remote Desktop programs without using any specific parameters like local ports. To connect to winterm please use the webaddress https://rdsweb.desy.de/rdweb/webclient/ or use xfreerdp as Remote Desktop program.
Technical Questions and Problems
My SSH connection drops frequently - What can I do?
If your SSH connection drops frequently, please first make sure that your device has a stable network connection. If possible, preferably connect via a wired network and not via WLAN. If your SSH connection still drops regularly, please add the two options ServerAliveInterval and ServerAliveCount to the SSH tunnel command. Here is an example of establishing an SSH connection to access internal web pages:
ssh -D 2280 -o ServerAliveInterval=60 -o ServerAliveCountMax=3 username@bastion.desy.de
If you do not want to specify the options every time you call, you can also customize or create your SSH configuration file in your AFS home directory for this purpose:
~/.ssh/config
Save the file with the following content:
Host *
ServerAliveInterval 60
ServerAliveCountMax 3
If you use PuTTY
Select "Connection" from the menu on the left. A field called "Seconds between keepalives" appears in the right pane. Change the value here to 60. This corresponds to the SSH option "ServerAliveInterval".
What is an SSH Tunnel?
An SSH tunnel is a network connection between two computers, which is routed through a gateway computer (here bastion.desy.de). It is necessary, for example, if the target computer cannot be reached directly from the Internet. The following figure illustrates the basic concept.
I get a Warning about the RSA Key - What shall I do?
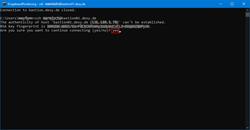
When you connect your device (laptop/PC) to bastion.desy.de for the first time, you will receive a message as shown in the adjacent figure. This informs you that the authenticity of the target server, in this case bastion.desy.de, could not be confirmed.
The reason for this is that your device and the target server do not yet "know" each other.
The target computer sends a key fingerprint (security key) that is displayed to you and you are asked to confirm the connection. Since you want to connect to bastion.desy.de, you can do so. The key fingerprint (security key) will be saved on your device together with the name (host name) of the target computer in a list. If you connect to bastion.desy.de again, your computer can check the entry from the list and verify the authenticity of the target computer.
The Command "ssh" cannot be found in the command line - What should I do?
If you receive an error message like the one shown in the adjacent figure, but you are running Windows 10, please follow these steps to resolve the problem
- Install all operating system updates and then restart the computer
If the problem persists, please check if the Windows SSH client is installed:
- Right-click the Windows icon in the lower left corner of the taskbar
- Click on "Apps and Features
- Click on "Optional Features" in the new window
- Click "Add Feature" and select "OpenSSH Client" for installation from the list
-
Restart your computer afterwards
If the problem is still not solved, PuTTY must be used as SSH client. Please refer to the following PDF document for instructions on how to connect to PuTTY.
Is it possible to use several SSH Tunnels at the same time?
Yes, that's no problem. However, please make sure that you use different local ports for each tunnel. The local port is that one which is specified before the target computer. In the following command e.g. 8006 is the local port:
ssh -L 8006:computername.desy.de:3389 username@bastion.desy.de
So if you want to establish an SSH tunnel for your Windows computer and one for your Linux computer, you will have to open two terminals and execute the following commands:
Terminal 1 (SSH Tunnel for Windows)
ssh -L 8006:computername.desy.de:3389 username@bastion.desy.de
Terminal 2 (SSH Tunnel for Linux)
ssh -L 8007:computername.desy.de:22 username@bastion.desy.de
Afterwards you will be able to connect to your Windows computer using localhost:8006 and to your Linux computer using localhost:8007.
UCO Hamburg

| Phone: | +49 (0)40 8998 5005 |
| E-Mail: | UCO Hamburg |
| Location: | 2b / 131d |
| Link: |
 https://it.desy.de/services/uco
|


