
URL: https://it.desy.de/services/uco/documentation/create_a_request_in_ams/@@siteview
Breadcrumb Navigation
Create a request in AMS
With the DESY Asset Management System (short: AMS), DESY users can initiate a procurement process for IT-relevant work equipment via https://ams.desy.de/. In addition to the DESY access data, the corresponding cost center number is required for this. If necessary, contact your group administration for a procurement process. Here you will find a list of the responsible Windows group administrations at DESY.
Information on the procedure
After successful creation of a request, 2 approvals are requested digitally.
- Technical approval by group administration
- Financial approval by person responsible for cost center (can be requested from your group administration if necessary).
As soon as the approvals have been granted digitally by the persons responsible, an ordering process for the work equipment will be triggered.
In order to keep the period from "creating a request" to "receiving the requested work equipment" as short as possible in your own interest, please note the following points:
- If possible, obtain verbal permissions from your group administration before creating requests.
- After the request has been created, the technical approval (approval 1) by your group administration and the financial approval (approval 2) by the person responsible for the cost centre (can be obtained from your group administration if necessary) must be issued digitally.
- Since the requested work equipment is not available in DESY in unlimited quantities, (usually short) delivery times of external suppliers may also be relevant.
Instructions: Create a request
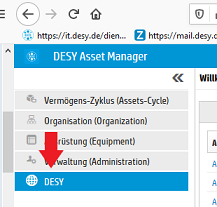
To create a request, you must first log in at https://ams.desy.de with your DESY access data. Then click on the DESY button in the menu bar in the left part of the screen. (Figure 1)
")
Figure 1
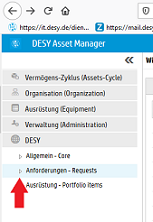
In the submenu that now opens, click on the small triangle next to "Anforderungen/Request". (Figure 2)
")
Figure 2
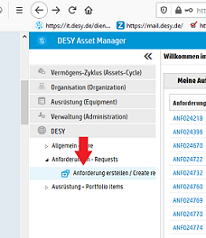
Click on "Anforderung erstellen/Create request". (Figure 3)
")
Figure 3
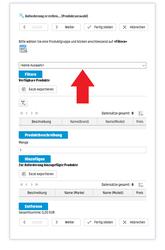
Select a product group from the drop-down menu. (Figure 4)
")
Figure 4
Click on the button "Filtern/Filter" to display the available products. (Figure 5)
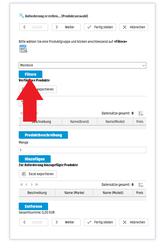
")
Figure 5
Select a product. Click on the circle to the left of the description. (Figure 6)
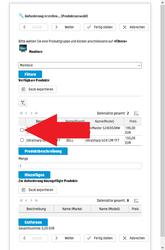
")
Figure 6
Enter the quantity/Menge (number) of the selected product that you require. Click on the button "Hinzufügen/Add". Click on the button "Weiter/Next". (Figure 7)
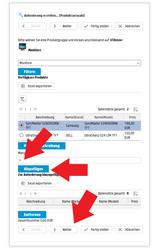
")
Figure 7
At this point you can make configurations for some devices by clicking the "Konfigurieren/Configure" button. Click on the "Weiter/Next" button. (Figure 8)
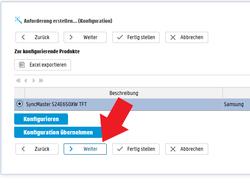
")
Figure 8
Fill in at least the red marked fields Reason, User and Cost center. Click on the "Weiter/Next" button. (Figure 9)
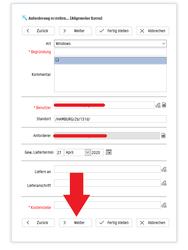
")
Figure 9
Check your entries and click on the "Fertig stellen/Finish" button. (Figure 10)
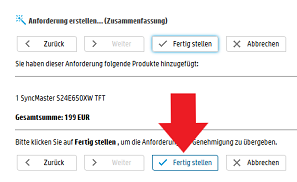
")
Figure 10