
URL: https://it.desy.de/services/networks/wlan_at_desy/desy/index_eng.html
Breadcrumb Navigation
The WLAN DESY
With the connection to the central DESY WLAN, you connect to the DESY intranet and can use this to call up internal DESY websites and establish connections to internally available IT services.
Preliminaries to connect to DESY WLAN
Registration of the device
As common in all internal networks the MAC addresses for the devices participating in the DESY WLAN have to be registered. If they have not yet been registered, or if anything should be unclear, please contact your Network Segment Administrator.
Note for Network Segment Administrators:
Wireless clients mac addresses have to get the QIP ObjectClass DESY_WLAN_DEVICE.
Registration of the account
As mentioned before, using the WLANs DESY implies that your account is registered for it. At DESY this access data consists of the DESY account name and a specific WLAN password. To create the WLAN password the user has to be assigned in the DESY registry for the resource wlan_desy by their Namespace-Administrator. Then the user is asked automatically via e-Mail to creat the WLAN password in the DESY registry.
It is mandatory that your WLAN password is set. This is always a different password than the one for your DESY user account. The WLAN password must be set via the DESY Registry (https://registry.desy.de).
Valid security certificate
Security certificates secure the communication of the network connection and are therefore required for establishing a WLAN connection. The security certificate with the designation "T-Telesec Global Root Class 2" is required. In many cases, this is already present on the end devices, but in some cases an explicit installation of the certificate is required.
You can find the required certificates on the following websites:
How do I connect my device to the DESY WLAN?
DESY-Windows Devices
If a centrally installed DESY Windows is used, manually configured WLAN settings are normally not necessary. If a connection to the DESY WLAN is to be established, only the user name and the WLAN password must be entered in the login window of the WLAN connection.
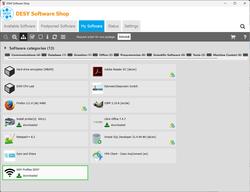
If there are problems and you cannot connect, please reinstall the WLAN profile via the DSM Shop.
To do this, open the DSM Shop and click on the "My Software" tab. There, go to the package "WLAN Profiles DESY" and click on "Reinstall" at the top. Now click on the shopping cart at the top right and confirm the installation.
If you still have problems, please contact the UCO (5005).
")
Windows (no DESY Installation)
Manual Installation (without DSM/NetInstall)
If you have a Windows device without DSM/NetInstall Software Shop, the WiFi profiles have to be installed manually. To install the needed WiFi profiles manually on Windows operating systems, first click on the link below to download the WiFi profiles for Windows, these profiles will have to be installed on your system in order to setup a new WiFi configuration. The procedure how to install these WiFi profiles is described in the following.
") DESYWiFi-profile-import_ISRG-X1.zip (1KB)
DESYWiFi-profile-import_ISRG-X1.zip (1KB)
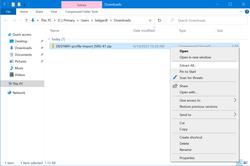
By clicking the link above you can downlaod the file. Usually the file is located in your Download directory after that. In case you are asked whether you want to save or open the file, save the file.
Then extract the folder in the file by right-clicking on the ZIP file and selecting the menu item "Extract all..." (see Figure 2).
")
Figure 2
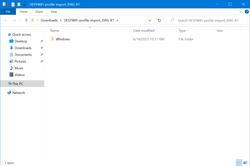
Afterwards, a new folder "DESYWiFi-profile-import_ISRG-X1" should be available. Open it with a double click, then you should see the folder "Windows" inside (Figure 3).
")
Figure 3
Then open the "Windows" directory. These directory contains one file with the file extension .bat, with the following name
- import WLAN_DESY_v2_Win10.bat
Double-click this file, to execute the installation.
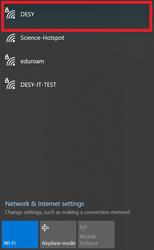
Afterwards open the list of WiFi networks using the WiFi icon in the lower right corner of the taskbar (see Figure 4).

")
Figure 4
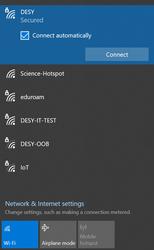
If the installation of the new WiFi profile was successful, you will see a new profile named DESY in the list of WiFi networks. Select this profile and click on the "Connect" button (see Figure 5).
")
Figure 5
")
Figure 6
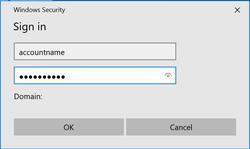
You will then be asked to enter your WiFi credentials. These are:
- Username: accountname
- Password: The WiFi password for the used account
Please replace accountname with the DESY account name you want to use for the connection. Then click on the "OK" button to confirm your entries (see Figure 7).
")
Figure 7
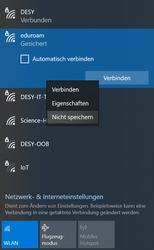
After entering your credentials, a connection should be successfully established. In the list of WLAN networks, the note "Connected, secured" should now be displayed under the profile name (see Figure 8).

")
Figure 8
If the connection with the new profile was successful, remove the old WLAN profile. Do this by right-clicking on the old profile and then clicking on "Forget" (see Figure 9).
")
Figure 9
MacOS
|
On macOS (requires an up-to-date operating system, macOS 26 as of 12/2025), the Wi-Fi profiles are pre-installed centrally. Therefore, no further steps are necessary for registered devices (see prerequisites). If you don't have a centrally managed MacBook, please download and install the following WLAN profile: |
")
No connection possible
|
Linux
Since DESY does not provide laptops with Linux, WiFi support for Linux laptops can only be achieved in a limited way.
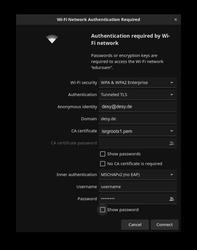
Below is a screenshot of the required settings for setting up Ubuntu (or in general Gnome NetworkManager).
The required certificate be found here or is already available in the common Linux distributions.
Otherwise all the settings from the section "manual setup" are still valid.
Note: If it does not work with this configuration please try to leave the "Domain" field empty instead of entering desy.de there.
")
Information for a manual Setup
A manual setup of the WiFi connections is not always necessary. Therefore, first check whether specific instructions for one of the operating systems listed above can be applied to your device. If the automatic setup of the WiFi profiles with the operating system specific instructions is not possible, please use the following information for a manual setup of your WiFi connections.
Security Certificate
First download the Security Certificate "ISRG Root X1" (Let's Encrypt) and install it afterwards. To get this done please use the following link: ISRG Root X1
After clicking on the certificate you will probably be notified that the certificate is already installed. In that case there is nothing else to do for you at this point and you can proceed to setup the WiFi connection using the preferences listed below. Otherwise, after downloading the certificate, you will have the opportunity to install the certificate guided by the operating system and should do so before setting up the WiFi connection.
WiFi Settings
In the following section you can find the needed settings to setup the WiFi network DESY.
DESY
| WiFi Name (SSID): | DESY |
| Security Type: | WPA2-Enterprise / Firmenweiter WPA2 |
| Authentication Type: | TTLS/EAP-MSCHAPv2 |
| Data Encryption: | AES |
| Authentication Protocol: | MS-CHAPv2 |
| Domain: | desy.de |
| Anonymous Identity (!): | intern@desy.de |
| Username (!!): | accountname |
| Password: | WiFi Password belonging to the used DESY account |
(!) Depending on the operating system used, this field may also be named "external identity" or "roaming identity".
(!!) Depending on the operating system used, this field may also be named "inner identity" or "identity". Please change accountname into the DESY account name with which you want to establish the connection.
Exception: registered mobile devices
iPhone / iPad
First, click on the appropriate profile below to download the DESY WiFi profile. For the Eduroam WiFi please click here instead. In the following the procedure to add the internal Desy network to registered devices is explained:
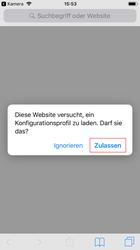
(Attention: To make sure that the configuration file is recognized by iOS, please download it with Safari
After clicking on the link, a window will open. Here you have to confirm that you want to load the new WiFi profile (figure 1).
")
Figure 1
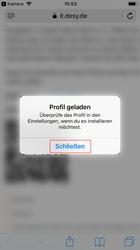
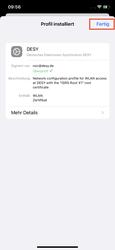
After that the profile is loaded but still has to be installed. Close the message saying the profile is loaded (figure 2) and continue with the next step.
")
Figure 2
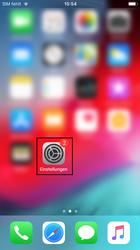
Open the system settings using the app menu (figure 3).
")
Figure 3
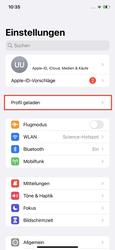
In the settings you will find a marked menu item which is waiting for your action. Click on "Finish configuration" (figure 4).
")
Figure 4
In the newly opened window information about the profile and the (new) security certificate (contained in the profile) is shown up. The details have to match the information on figure 5. Please compare them. Afterwards install the new WiFi profile by clicking "Install" (figure 5).

")
Figure 5
To confirm the process, you have to enter the code which you have set up for your mobile device (figure 6).
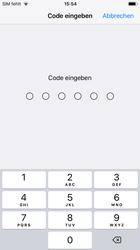
")
Figure 6
Now that you have confirmed the WiFi profile installation, you have to install the security certificate, too. In the new window you will be informed, that the new security certificate (ISRG Root X1) will be added to the list of trusted certificates in your system. Confirm this process by clicking "Install" (figure 7).
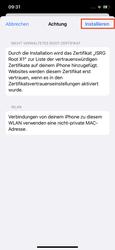
")
Figure 7
The process has to be confirmed again in the next step. Therefore click on "Install" again (figure 8).
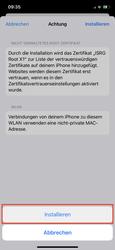
")
Figure 8
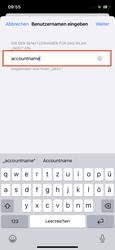
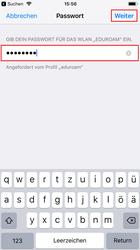
In the following two windows (figure 9 and 10) you have to type in your login information which shall be used to setup the new WiFi profile. The login information is:
- Username: accountname
- Passwort: Your WiFi Password belonging to the used account
Please replace accountname with the DESY account name you want to use for the connection. Confirm the entered information by clicking on "Continue" (figure 9).
")
Figure 9
Afterwards you will be prompted to type in your WiFi password. Enter it into the text field and click on "Continue" (figure 10).
")
Figure 10
As a last step you can compare the profile information with the information shown on figure 11 and confirm by clicking on "Finish" (figure 11).
")
Figure 11
Afterwards you should be able to connect to the WiFi network for which you have just installed the new profile. The new security certificate, which is integrated in the installed profile, will automatically be used on your device for this connection from now on.
Android
Please note that the terms and menu items in the following manual may differ from the ones on your device, depending on the manufacturer, operating system version and the device itself. Due to this variety, it is unfortunately not possible to provide general instructions for all Android devices.
This manual was created using a Samsung device and is therefore applicable to the DESY standard Samsung devices.
The first step is to download and install the new security certificate ISRG Root X1. To do this, please click on the following link on your mobile device to initiate this process.
(Attention: It is currently not possible to download the certificate with Firefox. Please use a different browser, for example Chrome.)
")
After clicking on the link above, the certificate can be downloaded and installed. Your device will ask you once for your key lock. Then enter a name for the certificate and select Wi-Fi as "Credential Use" (see Figure 1).
On some devices the certificate won't be automatically installed after the download. On the Google Pixel with Android 14 for example you have to search for "certificate" in the system settings and when on the site "Install a certificate" you need to click on "Wi-Fi certificate" as shown in Figure 1a. You will be directed to your downloads and then have to select the just downloaded certificate. After that you can proceed with naming the certificate.
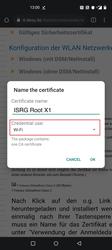
")
Figure 1
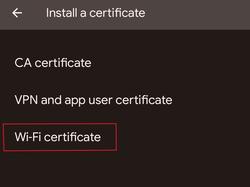
")
Figure 1a
Now open the available Wi-Fi networks and select "DESY" to connect to the network (see Figure 2). If you should still have a saved DESY profile, please remove it first. Select the saved profile and press Remove.
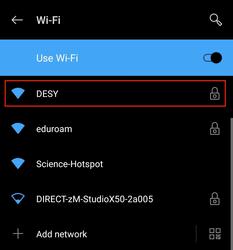
")
Figure 2
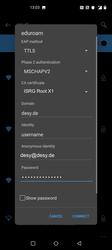
Select the previously installed "ISRG Root X1" certificate as the "CA certificate" (see Figure 3). In addition enter the following data:
- EAP-Method: TTLS
- Phase2 Authentication: MS-CHAP v2
- Domain: desy.de
- Identity: accountname (your DESY account)
- Anonymous identity: desy@desy.de
- Password: Wi-Fi password belonging to the used account
-
(if necessary: use the device own mac adress - not random mac adress)
Please replace accountname with the DESY account name you want to use for the connection. If applicable please already enter the Anonymous Identity and Phase2 Authentication here. Otherwise please first click on "Advanced" to enter these settings. Confirm the entered information by clicking on "Connect" (see Figure 3).
For devices with Android version 14 the TLS version 1.2 must be selected (see Figure 4).
")
Figure 3
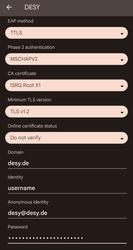
")
Figure 4
Afterwards you should be able to connect to the selected WiFi network "DESY" successfully using the installed certificate and the applied settings by clicking on "Connect".