
URL: https://it.desy.de/services/request_tracker/edit_ticket/index_eng.html
.
Breadcrumb Navigation
Edit ticket
To get to the edit page of a ticket...
- ...navigate to the ticket and click on the ticket ID (number) or the subject of the ticket or
-
...enter the ticket number directly into the "Search Tickets..." field in the RT menu bar

The editing page of a ticket is divided into different ticket areas as follows, which are explained below:
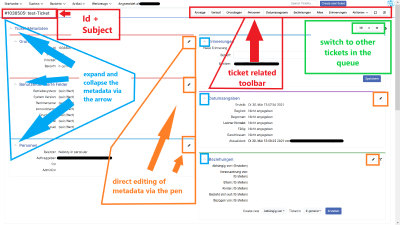
- The ticket ID (number) and the subject of the ticket are located in the upper left corner (Figure 4).
- In the upper ticket area "Ticket metadata" are the information about the ticket (Figure 4).
- In the lower ticket area "History", the contents of the individual responses and comments to the ticket are sorted chronologically descending (Figure 5).
- A ticket-related toolbar is fixed at the upper right edge of the ticket screen.
Ticket metadata
- The ticket area "Ticket metadata" is divided into individual data fields that can also be edited individually (Figure 4).
- Using small gray arrows in the upper left corner, individual data fields or the entire metadata can be expanded and collapsed (Figure 4).
-
The pencil icon in the upper right corner of the data fields (Figure 4) allows you to edit the individual data fields directly.
e.g.- Basics, change of the queue / area
- People: Entering an owner (the main person processing the request/ticket) or a mail address in the CC that also receives all responses to the ticket.
- Links: Here, among other things, tickets can be linked to each other so that they can each be reached with one click.
- Directly below the ticket-related toolbar, the ticket metadata area has its own small toolbar (Figure 4) that can be used to navigate within the queue.
")
Figure 4
Ticket History
- The ticket history is sorted chronologically in ascending order, so the original request can be found at the bottom. The answers and comments follow it.
- Comments are for internal communication and will not be sent to the client (the requesting person).
- The original request and comments or replies from the client include, among other things, the client's account or mail address and also the target mail address to which the client wrote (Figure 5). The destination mail address corresponds to the queue in this case.
- Comments or replies can be created via the toolbar -> Actions and also from the history (Figure 5).

")
Figure 5

