
URL: https://it.desy.de/services/e_mail/mail_clients/macos/index_eng.html
Breadcrumb Navigation
macOS
Mail is the mail program from Apple that can be used under MacOS.
Like Outlook, Mail synchronizes the data available in your mail account locally to your device and creates a corresponding profile there. The use of Mail is necessary if, for example, you need to make your e-mails accessible offline. For example, to be able to access your data while on the road.
Create an applicationcode
The synchonization of your emails on MacOS requires one to enter an applicationcode instead of your regular password.
To create an applicationcode, one must have the additional Two-Factor Authentication set up on Zimbra. Instructions can be found on this webpage:
https://it.desy.de/services/mfa/e_mail_programs/index_eng.html
Basic configurations (MacOS 13 and newer)
MacOS 12 or lower
In general we recommend to use Thunderbird. However if you want to use Apple Mail proceed as described.
Start Apple Mail and choose "Add Account" -> "Add other Mail Account..."
Type in your name, mail address and applicationcode.
")
Figure 1
You will then get a note to configure the account manually. Press "continue".
Afterwards type in the configuration for incoming and outgoing mails. (Image 1 & 2)
")
Figure 2
Now select "Mail account"(Fig. 3).
")
Figure 3
Enter your name, e-mail address and an applicationcode. (Fig. 4)
")
Figure 4
Then enter the data for incoming and outgoing mails (Fig. 5).
Select "IMAP" under Account type and enter "mail.desy.de" in the text fields for "Server for incoming mail" and "Server for outgoing mail" as shown in the picture.

")
Figure 5
Finally, please select all applications that should be connected to your email account. (Fig. 6)
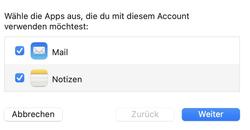
")
Figure 6
Now when you open Mac Mail, you can access your mail.
MacOS 13 or higher
In general we recommend to use Thunderbird. However if you want to use Apple Mail proceed as described.
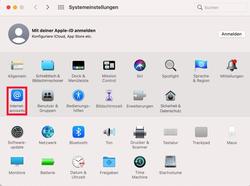
Start "System Settings" and choose "Internet Accounts" -> "Add Account ..."

")
Figure 1
You will then get a note to configure the account manually. Press "continue".
Afterwards type in the configuration for incoming and outgoing mails. (Image 1 & 2)

")
Figure 2
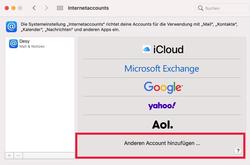
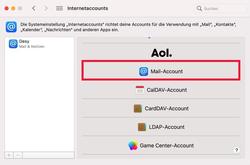
Now select "Mail account"(Fig. 3).
")
Figure 3
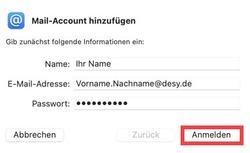
Enter your name, e-mail address and an applicationcode instead of your DESY password. (Fig. 4)

")
Figure 4
Then enter the data for incoming and outgoing mails (Fig. 5).
Select "IMAP" under Account type and enter "mail.desy.de" in the text fields for "Server for incoming mail" and "Server for outgoing mail" as shown in the picture.

")
Figure 5
Finally, please select all applications that should be connected to your email account. (Fig. 6)

")
Figure 6
Now when you open Mac Mail, you can access your mail.
Advanced configurations/information
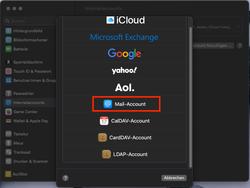
Set up contacts (iAdress) and calendar (iCal)
To set up contacts and calendars go to "System settings" -> "Internetaccounts"
Choose "Add other Account..."
- Add a CardDAV account for your contacts
- Add a CalDAV account for your calendars
You will be prompted to enter in your credentials again.
Please, enter your DESY email address into the "Email Address" and the applicationcode into the "Password" field. Click on "Sign In" afterwards (Fig. 7)
If you have already closed your applicationcode, you can create a new one just for your calendar.
The configuration looks for both as shown below:

")
Figure 7
Find shared calendars on macOS
Neither Exchange nor CalDAV will show you the shared calendars from other people, as long as you you have actived the iCal delegation.
Therefore, you can use the following workaround:
- Make sure you are accessing your calendar via CalDav.
- Deactivate the iCal delegation via WebUI.
- Synchronise your calendar on MacOS.
- Reactivate the iCal delegation via WebUI.
You can find the "iCal delegation" within the Zimbra webclient ->
"Preferences" -> "Calendar" -> "Apple iCal"

")