URL: https://it.desy.de/services/e_mail/mail_clients/thunderbird/index_eng.html
Breadcrumb Navigation
Thunderbird

Mozilla Thunderbird is offered for installation at DESY both for Windows in the Software Manager DSM and for Ubuntu in the software repositories.
Like Microsoft Outlook, Mozilla Thunderbird also synchronizes the data available in your mail account locally on your device and creates a corresponding profile there. The use of Thunderbird is necessary if, for example, you need to make your e-mails accessible offline. For example, to be able to access your data when you are on the move.
| ⚠ |
Please note that Thunderbird is not supported by DESY for managing your calendars, as tests have shown various errors in handling calendar entries. If you are interested, you can find further information on the following website: https://it.desy.de/dienste/kalender/ |
Please also note that some settings or approvals cannot be made in Thunderbird itself, but must be made via the Zimbra web interface (https://mail.desy.de). Instructions on how to use the web interface of the DESY mail server can be found here.
Create an applicationcode
The synchonization of your emails on Thunderbird requires one to enter an applicationcode instead of your regular password.
To create an applicationcode, one must have the additional Two-Factor Authentication set up on Zimbra. Instructions can be found on this webpage:
https://it.desy.de/services/mfa/e_mail_programs/index_eng.html
Basic configurations
Base configuration
Create account for DESY mailbox in Thunderbird
Note: The following instructions were created using Thunderbird 115.8
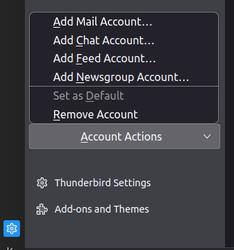
- Click on Edit in the top menu bar and select Account actions in the drop-down menu.
- At the bottom left under Account actions, select Add mail account (Figure 1).
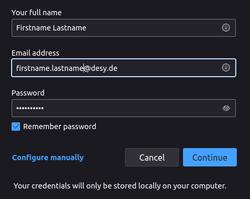
- Enter a name and the e-mail address for your mailbox, as well as an application code. After entering the application code, please click on the button for manual setup (Figure 2).
-
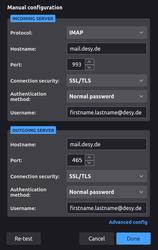
Click on Configure manually to set the following configurations for your DESY mailbox
(Figure 3).
⤷ Configuration for receiving e-mails (incoming mail server)
- Servername: mail.desy.de
- Port: 993
- Verschlüsselung: SSL/TLS
- Authentifizierung: Normal password
-
Benutzername: E-mail address is entered automatically, alternatively DESY user name
⤷ Configuration for sending e-mails (outgoing mail server)
- Servername: mail.desy.de
- Port: 465
- Verschlüsselung: SSL/TLS
- Authentifizierung: Normal password
- Benutzername: E-mail address is entered automatically, alternatively DESY user name
Adjust server settings for existing account
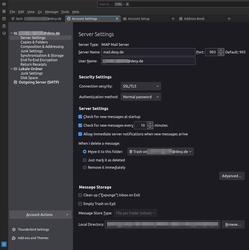
To modify an existing configuration please navigate in the upper menubar to 'Edit' -> 'Properties' (Alternatively: Right-click on your mailaccount and choose 'Settings'). Now you need to navigate to 'Server Settings' and insert the necessary serverinformation (Figure 4).
Configure Addressbook (LDAP)
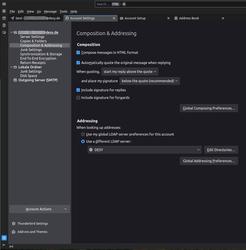
During the next step you can modify the Thunderbird address directory configuration in order to get access to the DESY address book (LDAP) (though just with limited functions compared to Outlook). Please navigate to your account settings and choose in the left menubar 'Composition & Addressing'. Select 'Use a different LDAP Server' and insert following configuration data.
Currently the address directory is used only during composing an e-mail while typing in an address. The separate addressbook functionality is currently not available due to a technical restriction.
NB: Please note that the LDAP server is only accessible from the internal network and can therefore only be used on the road on workstations with a VPN connection.
To set up the address directory, please go to " Composition & Addressing" in the left-hand menu in the account settings and select the menu item "Use a different LDAP server" under Addressing (Figure 5).
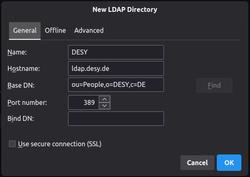
If there is no DESY server yet, please add it manually.
Serveraddress: ldap.desy.de
Base-DN: ou=People,o=DESY,c=DE
Port: 389
Bind-DN: -keep empty-
* Don't check Use secure connection (SSL) *
Advanced configurations/information
Import contacts from additional address books
Open thunderbird and choose the address book you want to import.
->address book -> choose the address book -> Export (view picture)
It is necessary that you save the file as .csv
Afterwards you can import the .csv file via Zimbra webclient.
Login at https://mail.desy.de
->Preferences ->Import/Export -> Import -> choose the .csv file-> Target = Contacts -> Import
Reach private/shared resources or calendars via CalDav
The private calendar can be accessed via CalDAV using the following scheme:
https://mail.desy.de/dav/name.surname@desy.de/Calendar
If it should be a shared calendar the path is:
https://mail.desy.de/dav/NAMESPACE_shared@desy.de/Calendar
If it should be a resource the path is:
https://mail.desy.de/dav/ressource@res.desy.de/Calendar
Please note that due to previous experience with the code quality of various add-ons, the service is only described, but without support.
Subfolder
Zimbra supports subfolders. The feature may need to be activated in Thunderbird first:
Settings -> Server Settings -> Advanced... -> Server supports folders that contain sub-folders and messages


