
URL: https://it.desy.de/services/e_mail/mail_clients/mobile_devices/index_eng.html
Breadcrumb Navigation
Mobile Devices

On a smartphone or tablet you can either use the mail client's web interface (https://mail.desy.de) in your browser or you can install an app matching your productivity needs.
Unlike with using apps the use of the web interface does not require a possibly complex setup.
Using the Zimbra Web Interface
If you want to avoid setting up e-mail or calendar apps on your mobile device, a convenient way to access your e-mail is the web app. Open an internet browser and type in https://mail.desy.de Log in with your DESY account name, DESY password and the MFA token password. Now you can access your e-mail folders, calendar and contacts.
We recommend trying out the web app first and only considering other applications if the web app does not fulfill your personal needs.
Using Apps
There is no recommendation regarding installable apps on mobile devices coming from DESY. However, please note the following general remarks before installing and using apps.
Due to data security, account information must not be stored on external servers. Because of this you should check prior to using an app whether data is stored externally when using said app. We strongly advise against the use of Outlook on mobile devices since account information would be stored on Microsoft servers.
Apps, after setup, provide a local copy of your data on your device so that you can access your data even when the device is offline.
IMAP nad CalDAV should be the primary synchronization methods, since currently (02/2026) these protocols seem to work more stable than Exchange Active Sync. If synchronization via IMAP/CalDAV is impossible or unwanted, then e-mails should be transmitted to your device using Exchange Active Sync, calendars with a CalDAV account and contacts with a CardDAV account respectively.
 Exchange ActiveSync should only be used as alternative to IMAP/CalDAV because the experience shows that this protocol does not work very reliable, especially with the use of calendars. However, Exchange Active Sync includes synchronization of your e-mail as well as your personal calendar and contacts. The access to Exchange ActiveSync may need to be activated by your Namespace Adminstrators or by UCO.
Calendars and mailboxes that are shared with you can not be synchronized this way. You need to use CalDAV in addition to ActiveSync if you want to sync shared calendars (e. g. group calendars) in addition to your personal calendar.
 Data transmission to and from the e-mail service has to be encrypted. For this, certain security certificates are necessary on the device. Since not all mobile devices come with those in the first place, you might need to install the latest security certificates before setting up your e-mail account. The certificates can be found here: https://www-ca.desy.de/zertifikate_dfn_pca/index_ger.html
Support
Please be aware that in case of problems only those devices can be supported that still receive the latest system updates. Devices that do not receive the latest updates anymore can not be supported due to technical and security reasons.
Because of the variety of available apps in combination with different device models the DESY IT department may be limited in their means of providing support. We ask you to be understanding of that.
If you need any support, please reach out to the IT helpdesk (Tel.: 5005, e-mail: uco@desy.de)
Create an applicationcode
The synchonization of your emails requires one to enter an applicationcode instead of your regular password.
To create an applicationcode, one must have the additional Two-Factor Authentication set up on Zimbra. Instructions can be found on this webpage:
https://it.desy.de/services/mfa/e_mail_programs/index_eng.html
Instructions for iOS Devices
Synchronization of Calendar + Mailbox (Exchange Active Sync)
Manual based on iOS 14.6.
To avoid incurring unnecessary costs during the transfer of data after setting up your ActiveSync account, it is advisable to have the device connected to a WLAN network, especially during the initial synchronization.
Note: With ActiveSync as the synchronization method, calendars and mailboxes that have been shared with you (e.g. group calendars or similar) are NOT synchronized. If you wish to do this, you will need to configure those via the CalDAV and IMAP synchronization method respectively. The configuration is described further down on this website.
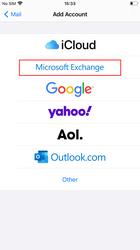
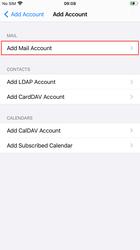
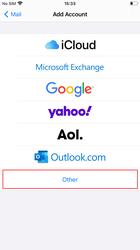
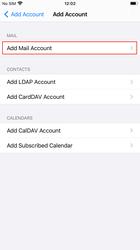
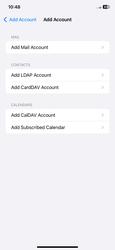
Step 1. Add Account
|
 of your iOS device and select the "Mail" category there

")
Abbildung 1
")
Abbildung 2
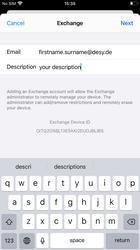
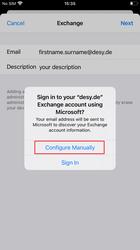
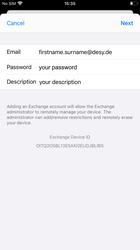
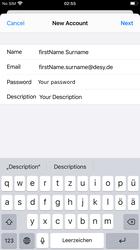
Step 2 - Setup Account
|
")
Abbildung 3
")
Abbildung 4
")
Abbildung 5
|
")
Abbildung 6
")
Abbildung 7
Step 3 - Synchronize account
|
Once the Exchange ActiveSync account is set up, your device will start transferring data from the service to your mobile device. This process can take a while, depending on the amount of data that needs to be transferred. To avoid incurring unnecessary costs, it is advisable to have the device connected to a WLAN network during this process. Note on the term "Microsoft Exchange ActiveSync"In this case, the term "Exchange ActiveSync" has nothing to do with the Microsoft Exchange Server, as the name might misleadingly suggest. Instead, it refers to a specific way of transferring data (so-called data transfer protocol). Although this type of data transfer was developed by Microsoft, it cannot only be used in conjunction with a Microsoft Exchange Server. |
Synchronization of email only (IMAP)
Manual based on iOS 14.6.
To avoid incurring unnecessary costs during the transfer of data after setting up your IMAP account, it is advisable to connect the device to a WLAN network, especially before the initial synchronization.
Step 1 - Add account
|
")
Abbildung 1
")
Abbildung 2
")
Abbildung 3
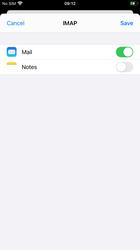
Step 2 - set up account
|
")
Abbildung 4
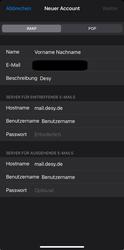
Abbildung 5
")
Abbildung 6
|
Step 3 - Synchronize account
|
As soon as the IMAP account has been set up, your device will start transferring the data from the service to your mobile device. This process may take a while, depending on the amount of data that needs to be transferred. To avoid incurring unnecessary costs, it is advisable to have the device connected to a WLAN network during this process. During the synchronization process, you can open the Mail app on your iOS device to view the first synchronized messages. |
Reach private/shared/resource calendar via CalDav
Please note that Thunderbird Lightning is not supported by us and unfortunately we cannot provide support for problems with calendars in connection with Lightning!
The private calendar can be accessed via CalDAV using the following scheme:
https://mail.desy.de/dav/vorname.nachname@desy.de/Calendar
If it should be a shared calendar the path is:
https://mail.desy.de/dav/NAMESPACE_shared@desy.de/Calendar
If it should be a resource the path is:
https://mail.desy.de/dav/ressource@res.desy.de/Calendar
Step 1 - Add Account
|


")
Abbildung 1

")
Abbildung 2
")
Abbildung 3
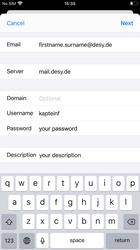
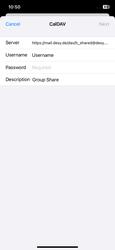
Step 2 - Account Setup
-
In the next dialog, enter the following address in the "Server" text field
where please replace "Group abbreviation" with the abbreviation of your own DESY group!
https://mail.desy.de/dav/Gruppenkürzel_shared@desy.de/Calendar
Figure 4 shows the path of the group share of the DESY group IT as an example, for members of the DESY group IT the path is therefore: https://mail.desy.de/dav/it_shared@desy.de/Calendar
If you are unsure about the name of the share of your DESY group, please ask the group administrator responsible for you. If required, you can find a list of the responsible persons on the following website: https://it.desy.de/dienste/uco/windows_gruppenadmins
- Then enter your DESY account name in the "User name" field as well an applicationcode. Also enter a descriptive name for the CalDAV account in the "Description" field.
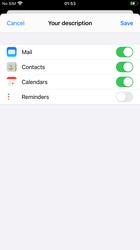
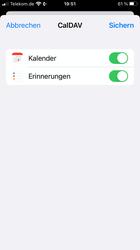
- In the next dialog, you can specify which elements you want to synchronize. Calendar should always be activated here. See Figure 5.
")
Abbildung 4
")
Abbildung 5
Step 3 - Calender Synchronization
As soon as the CalDAV account has been set up, all shared group calendars to which you have access should appear for selection in your calendar app. In the Apple Calendar app, click on "Calendar" at the bottom of the app. Here you have the option of activating or deactivating the synchronization of individual calendars.
Please note that the synchronization process can take a while, depending on the amount of data that needs to be transferred. To avoid incurring unnecessary costs, it is advisable to have the device connected to a WLAN network during this process.
Instructions for Android Devices
Ways to synchronize Android devices with Zimbra
Note: With ActiveSync as the synchronization method, calendars and mailboxes that have been shared with you (e.g. group calendars or similar) are NOT synchronized. If you wish to do this, you will need to configure those via the CalDAV and iMAP synchronization method respectively.
Selecting an email app
Synchronization via an Exchange ActiveSync-account
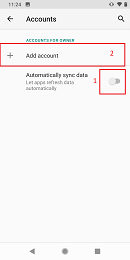
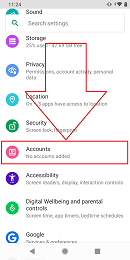
1. Open Settings and select Accounts

")
2. Switch off automatic data synchronization, Add account
")
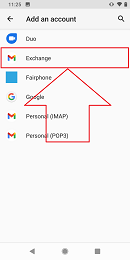
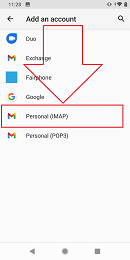
3. Select Exchange
")
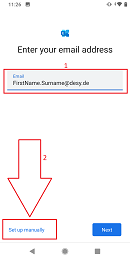
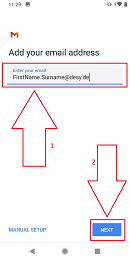
4. Enter your email address, select Set up manually
")
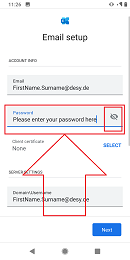
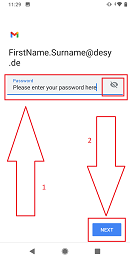
5. Enter applicationcode
")
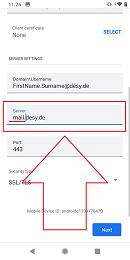
6. Enter the mail server
")
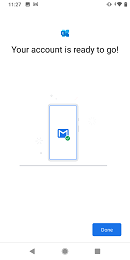
7. Configuration completed
")
Add an IMAP account
1. Open Settings and select Accounts
")
2. Switch off automatic data synchronisation, add account

")
3. Select IMAP
")
4. Enter your email address
")
5. Enter your applicationcode
")
6. Enter the incoming mail server
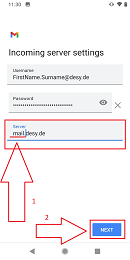
")
7. Enter the outgoing mail server

")
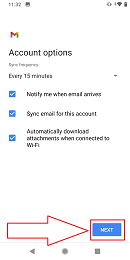
8. Account options
")
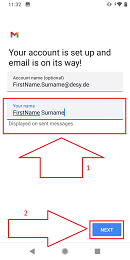
9. Complete configuration
")
Mobile Zimbra web client
")
FAQ
I am asked to encrypt my phone. What should I do?
Sometimes users are requested to encrypt their smartphone when using the ActiveSync protocol. Zimbra does no request such encryption, but instead does not inhibit it. Older Android version misinterpret this as a request for encryption.
If you do not want to encrypt your smartphone, please do not use ActiveSync but instead IMAP for reading your e-mails and CalDAV for your appointments and CardDAV for your contacts.
=> If you would like to encrypt your device, please backup all your data beforhand and ensure your device is connected to an external power supply during the encryption process. <=
reach private/shared/resource calendar via CalDav
Please note that Thunderbird Lightning is not supported by us and unfortunately we cannot provide support for problems with calendars in connection with Lightning!
The private calendar can be accessed via CalDAV using the following scheme:
https://mail.desy.de/dav/vorname.nachname@desy.de/Calendar
If it should be a shared calendar the path is:
https://mail.desy.de/dav/NAMESPACE_shared@desy.de/Calendar
If it should be a resource the path is:
https://mail.desy.de/dav/ressource@res.desy.de/Calendar
Problem with mobile device and email,appointments,contacts,reminders
Access to emails, contacts, appointments and reminders via mobile devices is done from different operating systems (Apple iOS, Google Android or Windows Mobile) with diverse programs using different protocols.
This leaves enough room for software errors. We cannot continuously update these in our FAQs. Therefore here is a link to Microsoft, which describes problems with access via ActiveSync:
Problems when accessing via ActiveSync and devices of other manufacturers.
Missing attachments on iPhone/iPad
Sometimes you see that an attachment has been sent with an email, but the complete email is not loaded yet. Then you can click "Load email completely". After that, the attachment has disappeared without a trace.
Just as occasionally, an attachment should be attached to an e-mail, e.g. because the text of the e-mail suggests this, and yet you do not see an attachment.
In both cases, please use the mobile view in your web browser on the mobile device and use it to view the attachment or check whether there is indeed an attachment.
This problem occasionally occurs with iOS devices (iPhone/iPad) and is an issue that has been known since at least 2012 and has not yet been resolved by Apple.
Error message during setup with Exchange ActiveSync
If you are receiving an error message similar to the ones listed below, it might be due to the missing activation of your accounts attributes (mailbox class: "outlook_sync").
In this case, please contact your Namespace Adminstration or UCO (5005/uco@desy.de).
Error messages:
iOS: Account could not be verified
Android: An error occured. Please try again or contact your IT Adminstration.